Samsung Gear - how to fail at UX
Samsung Gear - how to fail at UX
These devices look interesting, and I’m very excited about smart wearables shipping with built-in heart rate monitors. However, it looks like Samsung has totally failed on the UX front. These things look incredibly cumbersome to interact with.
Specifically, in clip of setting the wallpaper, when the wallpaper is selected, why are they returning the user to the wallpaper selection screen, as opposed to going straight back to the home screen?
How many new gestures are we going to need to learn to change the wallpaper?
Viewing a text message requires the user to open up the notification, instead of delivering the content in the notification view, and presenting actions there. This means that you need two taps to start recording a response.
In the S-Voice demo, that’s about the most verbose voice interaction I’ve seen. The amount of back-and-forth required to send a text message is obnoxious. You have to issue a ‘send’ command to actually send out the message. Why are they making status messages look like text messages from the person you’re trying to communicate with?
The Fit’s screen is facing the wrong direction. Good luck reading it. You’d need to hold your arm straight out to not see the thing at a funny angle.
I’m certainly excited about the future of wearables, and I think Samsung has some good ideas here, but the execution seems sub-par.
AWS S3 utils for node.js
AWS S3 utils for node.js
I just published my first package on npm! It’s a helper for S3 that I wrote. It does three things, it lists your buckets, gets a URL pair with key, and deletes media upon request.
The URL pair is probably the most important, because this allows you to have clients that put things on S3 without those clients having any credentials. They can simply make a request to your sever for a URL pair, and then use those URLs to put the thing in your bucket, as well as a public GET URL, so that anyone can go get it out.
var s3Util = require('s3-utils');
var s3 = new s3Util('your_bucket');
var urlPair = s3.generateUrlPair(success);
/**
    urlPair: {
        s3_key: "key",
        s3_put_url: "some_long_private_url",
        s3_get_url: "some_shorter_public_url"
    }
*/
Deleting media from your S3 bucket:
s3.deleteMedia(key, success);
Or just list your buckets:
s3.listBuckets();
I had previously written about using the AWS SDK for node.js here. It includes some information about making sure that you have the correct permissions set up on your S3 bucket, as well as how to PUT a file on S3 using the signed URL.
GlassGif - Notes for a live coding session using the GDK
GlassGif - Notes for a live coding session using the GDK
This post is intended to serve as a guide to building a GDK app, and I will be using it as I build one live on stage. The code that will be discussed here is mostly UI, building the Activity and Fragments, as opposed to dealing with lower level stuff, or actually building GIFs. If you’re interested, the code for building GIFs is included in the library project that I’ll be using throughout, ReusableAndroidUtils. The finished, complete, working code for this project can be found here.
Video
Project setup (GDK, library projects)
Create a new project.
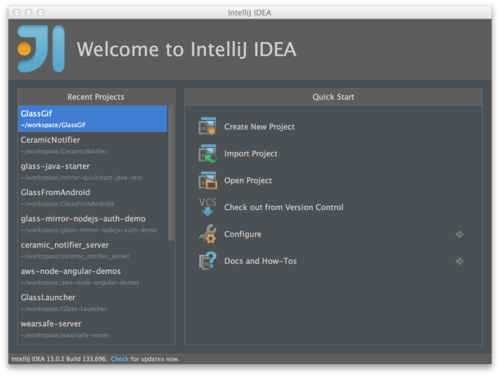
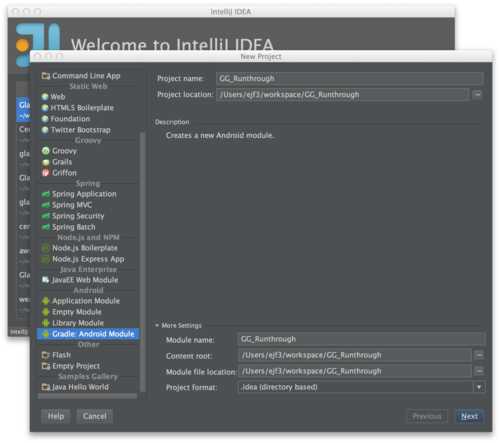
Select Gradle: Android Module, then give your project a name.
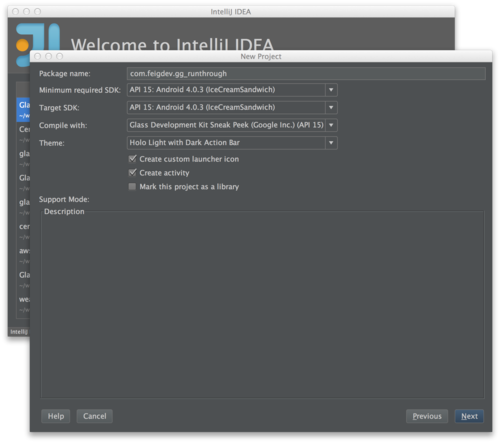
Create a package, then set the API levels to 15, and the ‘compile with’ section to GDK, API 15.
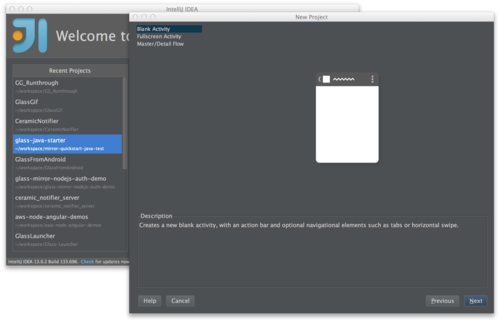
Let’s do a Blank Activity.
If gradle is yelling at you about local.properties, create local.properties file with the following:
sdk.dir=/Applications/IntelliJ IDEA 13.app/sdk/
Or, whatever location your Android SDK is installed at, then refresh Gradle.
You might need to re-select GDK. If your project is broken and not compiling. Highlight the module, and hit 'F4’ in Intellij/Android Studio.
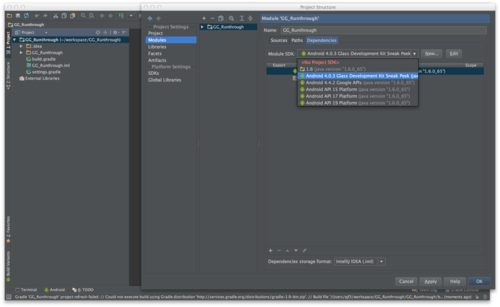
Now the project should be building.
Hello world & run
Let’s start out by just running 'hello world’. I’m adding this as a module, instead of creating a new project. As such, the manifest is not set up correctly, and needs to be modified:
Make sure it runs.
Fullscreen & run
Update the manifest to change the app’s theme to be NoActionBar.Fullscreen:
Make sure it runs.
Voice launch & demo
Turn the activity into an immersion:
I found this great blog post on adding voice actions. Add the voice_launch.xml:
And the string to strings.xml:
Run, and test saying OK Glass, launch the app.
Image capture & demo
Refactor structure to make the fragment its own file, ImageGrabFrag. Now, we are going to add some code to deal with the camera. The Android documentation on the Camera APIs is quite useful.
Here are a couple of StackOverflow discussions that might be helpful for common Camera problems.
Next, we need to add a SurfaceView to main fragment.
Now, we need to add a dependency on my library project, ReusableAndroidUtils, which contains a lot of helper code. To do this, clone the repo and import it as a module into your project. After you’ve imported it, update your build.gradle file to reflect the addition:
Next, I’m going to pull in a bunch of code for ImageGrabFrag. Here’s what we have at this stage for that file:
Finally, let’s update the manifest with the required permissions.
Copy that in, make sure it all compiles, and try running. At this point, you should get a garbled preview that looks all funky:

What’s happening here? Well, Glass requires some special parameters to initialize the camera properly. Take a look at the updated initCamera method:
Ok, almost there. Now, we just need to capture an image. Take note of the added takePicture() call at the end of initCamera(). When we initialize the camera now, we’re going to try taking a picture immediately. Now we are running into an odd issue.
Try launching the app from the IDE, then try launching it with a voice command. When you launch from your IDE or the command line, it should work. If you launch from a voice command, it will crash! There are a couple things that we need to change. First, there’s a race condition going on right now. We are currently initializing the camera after the SurfaceHolder has been initialized, which is good, because if that wasn’t initialized, the camera would fail to come up. However, when we launch with a voice command, the microphone is locked by the system, listening to our voice command. The Camera needs the mic to be unlocked, because we might be trying to record a video. Thus, we get a crash.
The error, specifically, is the following:
Camera﹕ Unknown message type 8192
There are several discussions about this issue floating around:
The thing to do is to delay initializing the camera a bit:
Try running again, and it should work this time.
Multi-Image capture
This part’s simple. We just modify our image captured callback, and add a counter.
We’re also going to add a static list of files to the main activity, to keep track of them. We’ll need that later.
Combine to gif
Now we need another fragment. We’re going to do a really simple fragment transaction, and we’ll add an interface to help keep things clean. Here’s the interface:
We need a reference to it in the ImageGrabFrag:
Then we need to change what happens when we finish capturing our last photo:
Here’s the final version of the ImageGrabFrag, before we leave it:
Alright, time to add a new fragment. This one needs a layout, so here’s that:
And here’s the fragment that uses that layout:
While there is a fair bit of code here, what’s going on is pretty simple. We are kicking off an AsyncTask that iterates through the files, builds Bitmaps and adds those bitmaps to an ArrayList of Bitmaps. When that’s done, we can move on. Here’s a link to a StackOverflow discussion that explains how to build gifs.
For any of this to work, we need to actually do the fragment transactions. So, here is the updated Activity code:
Now we can run, and it will do stuff, but on Glass, it’s not going to be a very good experience. For one thing, you won’t have any idea what’s going on, as the user, while the gif is being built. For that, let’s do two things. First, we should keep the screen on. Update the Activity’s onCreate method:
Let’s also add a bit of eye candy to the fragment. I want to flip through the images as they’re being worked on. I also want a ProgressBar to be updated until the builder is finished.
Run it again, that’s a little better, right?
Static Card
First thing that I’d like to do is to insert a Card into the timeline with the image. Now, this works, but it’s not great. Currently, StaticCards are very simple. They do not offer much functionality at the moment, as the API is still being fleshed out. Hopefully soon it will be updated. For now though, let’s do what we can:
As a note, if you have not already, make sure that Gradle is set to build with the GDK:
Viewer
The StaticCard is OK, but not great for a viewer. We made a gif, not a single image. Let’s build a viewer. First thing is that we’ll add our last Fragment transaction method to the Activity.
The viewer itself is very simple. It’s just a WebView that is included in the library project. We don’t even need a layout for it!
There’s a bit of an issue with not being able to see the whole thing. I didn’t dig into figuring out how to fix that issue. There are other ways of getting gifs to display, but I couldn’t get them to work in a reasonable amount of time.
Getting the gif off Glass
This section almost warrants its own discussion, but basically the issue is this, without writing a bunch of code, and uploading the gif to your own server, there’s not really a nice, official way of sharing the gif. Ideally, that StaticCard that we created would support MenuItems, which would allow us to share out to other Glassware with a Share menu.
Luckily, I found this great blog post that provided a nice work-around. It describes how to share to Google Drive, and with only a few lines of code. Here’s the code:
It’s not the sort of thing that I’d feel comfortable releasing, however, it is enough to finish up here.
Wrap-up

Hacking Glass 101 - Video from the meetup
Hacking Glass 101 - Video from the meetup
The following are videos from the Hacking Glass 101 meetup, held at Hacker Dojo on 2/18/2014.
My talk on Mirror API, Mirror from Android and node.js:
Here are some extra resources from my talk.
Demo of Play Chord GDK Glassware, by Tejas Lagvankar:
Lawrence had some technical difficulties with his GDK presentation, but here’s what he was able to cover:
Dave Martinez wrapped everything up for us:
Big thanks to Sergey Povzner for filming and uploading for us!
Crashlytics is awesome!
Crashlytics is awesome!
I recently started playing with Crashlytics for an app that I’m working on. I needed better crash reporting than what Google Play was giving me. I had used HockeyApp for work, and I really like that service. My initial thought was to go with HA, but as I started looking around, I noticed that Crashlytics offers a free enterprise level service. No down-side to trying it!
I gave it a shot, they do a nice job with Intellij and Gradle integration for their Android SDK, so setting up my project was quite easy. I tested it out, and again, it was very simple and worked well. The reporting that I got back was quite thorough, more than what anybody else that I’m aware of gives you. It reports not just the stack trace, but the state of the system at the time of your crash. If you’ve ever run into an Android bug, this sort of thing can really come in handy.
But, then I ran into an issue. I had some thing that was acting funny, so I pinged the Crashlytics support. I was pretty sure that it was an Android bug, but hadn’t had time to really nail down what the exact problem was. After a short back and forth, I let them know that I’d try to dig in a little more when I had time, but that I was busy and it might not be until next week. The following day, I received a long, detailed response, that included Android source code, to explain exactly the condition that I was seeing. I was floored. They had two engineers working on this, figuring out exactly what the problem was, and what to do with it. I don’t think that I could imagine a better customer service experience!
As a note, I have no affiliation with Crashlytics outside of trying out their product for a few days. Their CS rep did not ask me to write this. I was so impressed that I wanted other people to know about it.
Mirroring Google Glass on your Desktop
Mirroring Google Glass on your Desktop
http://neatocode.tumblr.com/post/49566072064/mirroring-google-glass
I’m using this for a talk I’m giving tonight. Very useful!
Google’s new wearable heads up display is being shipped out to the first wave of people who signed up to be testers and is showing up more and more at meetups and hackathons. Here’s how to display the output of Google Glass on a desktop or laptop. It’s extremely handy when presenting and demoing!
Mirror API for Google Glass
Mirror API for Google Glass
I’m giving a few talks on the Mirror API for Google Glass, and I needed to organize some thoughts on it. I figured that writing a blog post would a good way to do that.
Here is the slide deck for the shared content of my Mirror talks:
Since I don’t want to miss anything, I’m going to follow the structure of the slides in this post. What I am not going to do, is be consistent with languages. I’ll be bouncing between Java and JavaScript, with bits of Android flavored Java thrown in for good measure. It really just comes down to what I have code for right now in which language. The goal here is to discuss the concepts, and to get a good high-level view.
What is the Mirror API?
What is it?
The Mirror API is one API available for creating Glassware. The main other option is the GDK. Mirror is REST based, mostly done server-side; it pushes content to Glass, and may listen for Glass to respond. The GDK is client-side, and is similar to programming for Android. The general rule of thumb, is that if you can do what you need to do with Mirror, that’s the right choice. Mirror is a bit more constrained, and is likely to deliver a good user experience, without a lot of effort. It also allows Glass to manage execution in a battery friendly way.
What does it do?
Mirror handles push messages from servers, and responds as necessary to them. The basic case is that your server pushes a message to Glass, then the message displayed on Glass as a Timeline Card.
How does it work?
If you’re coming from the Android world then you might be familiar with GCM, and push messages. Mirror works using GCM, similar to how Android uses GCM.
You can send messages to Glass, and receive messages from Glass. Sending messages is much easier than receiving messages. On the sending side, all you need is a network connection, and the ability to do the OAuth dance. If you want to receive data from Glass, you’ll also need some way for Glass to reach you, via a callback URL.
What’s the flow?
Glass registers with Google’s servers, and then your server sends requests to Google’s servers, and Google’s servers communicate with Glass. You can send messages to Google’s servers, and you can receive messages back from Glass via callback URLs that you provide. With that, you can get a back and forth going.
SO MANY QUESTIONS?!?!?!
I know, there’s a lot here. We’ll try to step through as much as possible in this post.
Setting up
Before you do anything else, you’ll need to head over to the Google Developer Console, and register your app. Create a new app, turn on ‘Mirror API’, and turn off everything else. Then, go into the Credentials section, so that you can get your Client Id and Client Secret. This is outlined pretty clearly in the Glass Quick Start documentation.
OAuth
To communicate with Glass, you’ll first need to do do the OAuth dance. The user visits your website, and clicks a link that will ask them to authenticate with one of their Google accounts. It then asks for permission to update their Mirror Timeline. After that’s done, you’ll receive a request at the callback URL, with a code. The code needs to be exchanged for a token. Once you have the token, you can begin making authenticated requests. The token will expire, so you’ll need to be able to re-request it when it does.
Further reading in the Quick Start.
Timeline
The timeline is the collection of Cards that you have on Glass, starting from the latest, and going back into the past. It also includes pinned cards, and things happening 'in the future’, provided by Google Now.
Here’s a video explanation from the Glass Team:
Why a Timeline?
Well, you’d have to ask the Glass team, why exactly a Timeline, but I could venture a guess. One of Glass’s issues is that it is more difficult to navigate with. You can’t dive into apps like you can on your phone, at least not quickly and easily. There’s no 'Recent Apps’ section, no home screen and no launcher (well, except from the voice commands).
Launching apps with voice commands allows you to do things, as opposed to going to an app and poking around. For example, saying OK Glass, start a bike ride launches Strava into a mode where it immediately begins tracking me with GPS and giving me feedback on that tracking. It does not let me look at my history there.
Glass tends to operate on push rather than pull. Glassware surfaces information to you, as it becomes relevant. This ability allows Glass to become incredibly contextual, though we have only seen bits of this so far with Google Now. Imagine a contextual Glassware that keeps a todo list of all of your tasks, both work and home. It could surface a Card when you get to your office with the highest priority work tasks that you have for that day. On the weekend, after you’re awake, it could tell you that you need to get your car into the shop to get your smog check.
A typical category of Glassware today is news, which all work well with a push approach. Now, this is not terribly useful on Glass, as it’s difficult to consume, but there are some good ones that have figured out how to deliver the content in a way that is pleasant to consume on Glass (Unamo, and CNN), or to allow you to save it off to Pocket for picking up later (Winkfeed).
The timeline is semi-ephemeral. Your cards will stick around for 7 days, and will be lost after that. Before you get all clingy and nostalgic, consider that that information is 7 days old, and will not only be stale, but difficult to even scroll to at that point. I have rarely gone back more than a day in my history to dig for something that I saw, and that was usually for a photo. Cards are usually a view into a service, so the information is rarely lost to the ether. Instead of scrolling for a solid minute trying to find something, you can pull out your phone and go to the app on your phone. Like G+ Photos, Gmail or Hangouts. Apps like Strava don’t even put your recent rides in your timeline, you have to either go to the app or their website for history.
What are Cards?
Cards are the individual items in the timeline. Messages that you send from your server to Glass users typically end up as timeline cards on the user’s Glass. There are a number of basic actions, as well as custom actions, that users can take on cards, depending on what the card supports. How this works will become apparent once we look at the code.
How do I insert Cards into the Timeline?
Using the API, of course! Let’s look at how to do this in a couple of languages.
Java:
TimelineItem timelineItem = new TimelineItem();
timelineItem.setText("Hello World");
Mirror service = new Mirror.Builder(new NetHttpTransport(), new JsonFactory(), null).setApplicationName(appName).build();
service.timeline().insert(timelineItem).setOauthToken(token).execute();
JavaScript:
client
    .mirror.timeline.insert(
    {
        "text": "Hello world",
        "menuItems": [
            {"action": "DELETE"}
        ]
    }
)
.withAuthClient(oauth2Client)
.execute(function (err, data) {
    if (!!err)
        errorCallback(err);
    else
        successCallback(data);
});
Further reading in the Developer Guides, and Reference.
Locations
Location with Glass can mean one of two things, either you’re pushing a location to Glass, so that the user can use it to navigate somewhere. Or, you’re requesting the user’s location from Glass. The Field Trip Glassware subscribes to the user’s location so that it can let the user know about interesting things in the area.
Sending Locations to Glass
Sending locations is very simple. Basically, you send a timeline card with a location parameter, and add the NAVIGATION menu item.
JavaScript:
client
    .mirror.timeline.insert(
    {
        "text": "Let's meet at the Hacker Dojo!",
        "location": {
            "kind": "mirror#location",
            "latitude": 37.4028344,
            "longitude": -122.0496017,
            "displayName": "Hacker Dojo",
            "address": "599 Fairchild Dr, Mountain View, CA"
        },
        "menuItems": [
            {"action":"NAVIGATE"},
            {"action": "REPLY"},
            {"action": "DELETE"}
        ]
    }
)
    .withAuthClient(oauth2Client)
    .execute(function (err, data) {
        if (!!err)
            errorCallback(err);
        else
            successCallback(data);
    });
I’m using this right now for something very simple. In a Mirror/Android app that I’m working on, I can share locations from Maps to Glass, and then use Glass for navigation. Nothing is more annoying than having Glass on and then using your phone for navigation because the street is impossible to pronounce correctly.
Getting Locations from Glass
This is a little more tricky. First, you need to add a permission to your scope, https://www.googleapis.com/auth/glass.location. Getting locations back from Glass is going to require you to have a real server that is publicly accessible. It should also support SSL requests if you’re in production.
Here’s some code from the Java Quick Start that deals with handling location updates:
LOG.info("Notification of updated location");
Location location = MirrorClient.getMirror(credential).locations().get(notification.getItemId()).execute();

LOG.info("New location is " + location.getLatitude() + ", " + location.getLongitude());
MirrorClient.insertTimelineItem(
    credential,
    new TimelineItem().setText("Java Quick Start says you are now at "
        + location.getLatitude()
        + " by " + location.getLongitude())
    .setNotification(new NotificationConfig().setLevel("DEFAULT"))
    .setLocation(location).setMenuItems(Lists.newArrayList(new MenuItem().setAction("NAVIGATE"))));
This will really help enable contextual Glassware. You could imagine Starbucks Glassware that offers you a discounted coffee when you get near a Starbucks. Or a Dumb Starbucks Glassware that does the same thing, but claims to be an art installation.
Further reading in the Developer Guides, and Reference.
Menus
Menus are the actions that a user can take on a card. They make cards interactive. The most basic one is DELETE, which, obviously, allows the user to delete a card. Other useful actions are REPLY, READ_ALOUD, and NAVIGATE.
You can see menu items added to cards in previous examples. I will repeat the JavaScript navigation example here:
JavaScript:
client
    .mirror.timeline.insert(
    {
        "text": "Let's meet at the Hacker Dojo!",
        "location": {
            "kind": "mirror#location",
            "latitude": 37.4028344,
            "longitude": -122.0496017,
            "displayName": "Hacker Dojo",
            "address": "599 Fairchild Dr, Mountain View, CA"
        },
        "menuItems": [
            {"action":"NAVIGATE"},
            {"action": "REPLY"},
            {"action": "DELETE"}
        ]
    })
    .withAuthClient(oauth2Client)
    .execute(function (err, data) {
        if (!!err)
            errorCallback(err);
        else
            successCallback(data);
    });
The Card generated from the example should allow you to get directions to the Hacker Dojo. You can also add custom menus, like Winkfeed’s incredibly useful Save to Pocket menu item.
Further reading in the Developer Guides, and Reference.
Subscriptions
Subscriptions allow you to get data back from the user. This can happen automatically, if you’re subscribed to the user’s locations, or when the user takes some action on a card that is going to interact with your service. E.g., you can subscribe to INSERT, UPDATE, and DELETE notifications. You will also get notifications if you support the user replying to a card with REPLY.
In Java:
// Subscribe to timeline updates
MirrorClient.insertSubscription(credential, WebUtil.buildUrl(req, "/notify"), userId, "timeline");
Subscriptions require a server, and cannot be done with localhost. However, tools like ngrok may be used to get a publicly routable address for your localhost. I have heard that ngrok does not play nice with Java, but you might be able to find another tool that does.
Among other things, you can learn from these sorts of subscriptions. You can learn which types of Cards get deleted the most, for example. Subscriptions can also listen for custom menus, voice commands and locations. With Evernote, you can say, take a note and it will send the text of your note to the Evernote Glassware.
Further reading in the Developer Guides, and Reference.
Contacts
Another important type of subscription is subscribing for SHARE notifications. The SHARE action also involves Contacts.
Contacts are endpoints for content. They can be Glassware or people, though if they’re people, they are probably still really some sort of Glassware that maps to people. Sharing to Contacts allow your Glassware to receive content from other Glassware. You can insert a Contact into a user’s time like so (in JavaScript):
client
    .mirror.contacts.insert(
    {
        "id": "emil10001",
        "displayName": "emil10001",
        "iconUrl": "https://secure.gravatar.com/avatar/bc6e3312f288a4d00ba25500a2c8f6d9.png",
        "priority": 7,
        "acceptCommands": [
            {"type": "POST_AN_UPDATE"},
            {"type": "TAKE_A_NOTE"}
        ]
    })
    .withAuthClient(oauth2Client)
    .execute(function (err, data) {
        if (!!err)
            errorCallback(err);
        else
            successCallback(data);
    });
It’s obvious what you want people Contacts for, but what about Glassware contacts? Well, imagine sharing an email with Evernote, or a news item with Pocket. Now, consider that as the provider of the email or news item, you don’t need to provide the Evernote or Pocket integration yourself, you just need to allow sharing of that content. It’s a very powerful idea, analogous to Android’s powerful sharing functionality.
Further reading in the Developer Guides, and Reference.
Code Samples
I have three sample projects that I have been pulling code from for this post.
- A slightly modified Java Quick Start provided by the Glass Team
- My Android Mirror demo
- My node.js Mirror demo
A bit of a diversion; it’s really fun to play!
A bit of a diversion; it’s really fun to play!
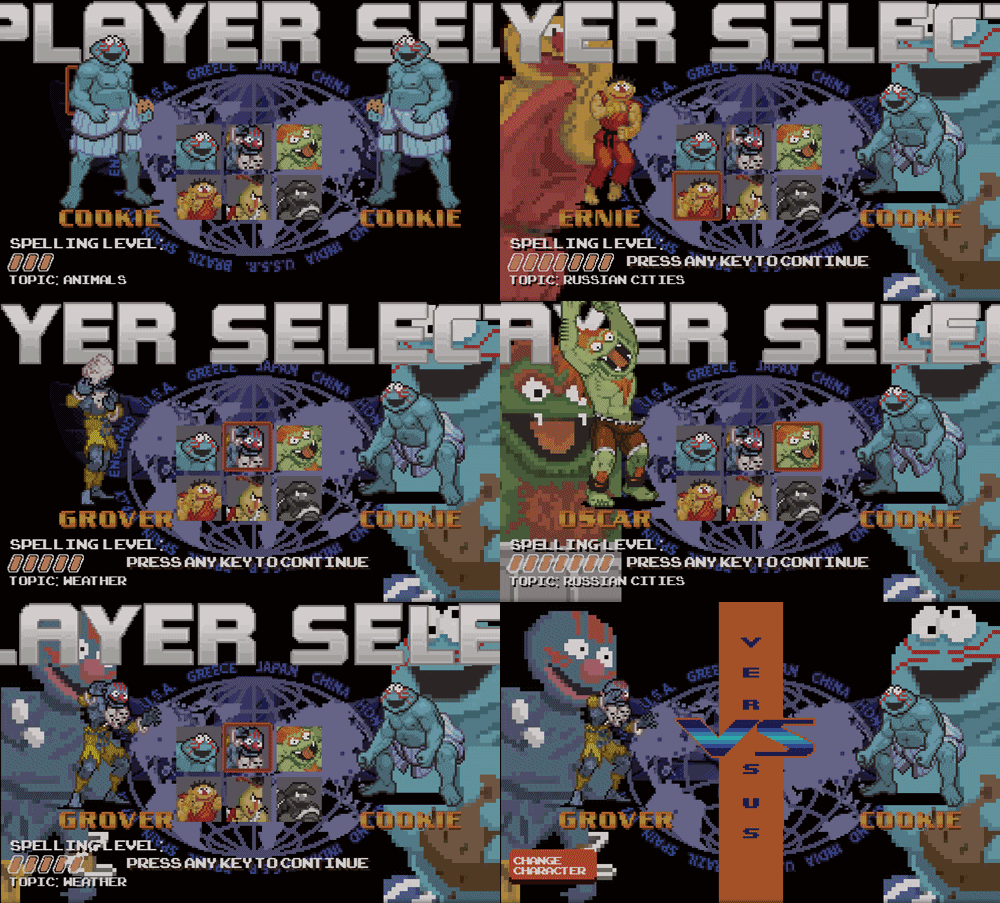
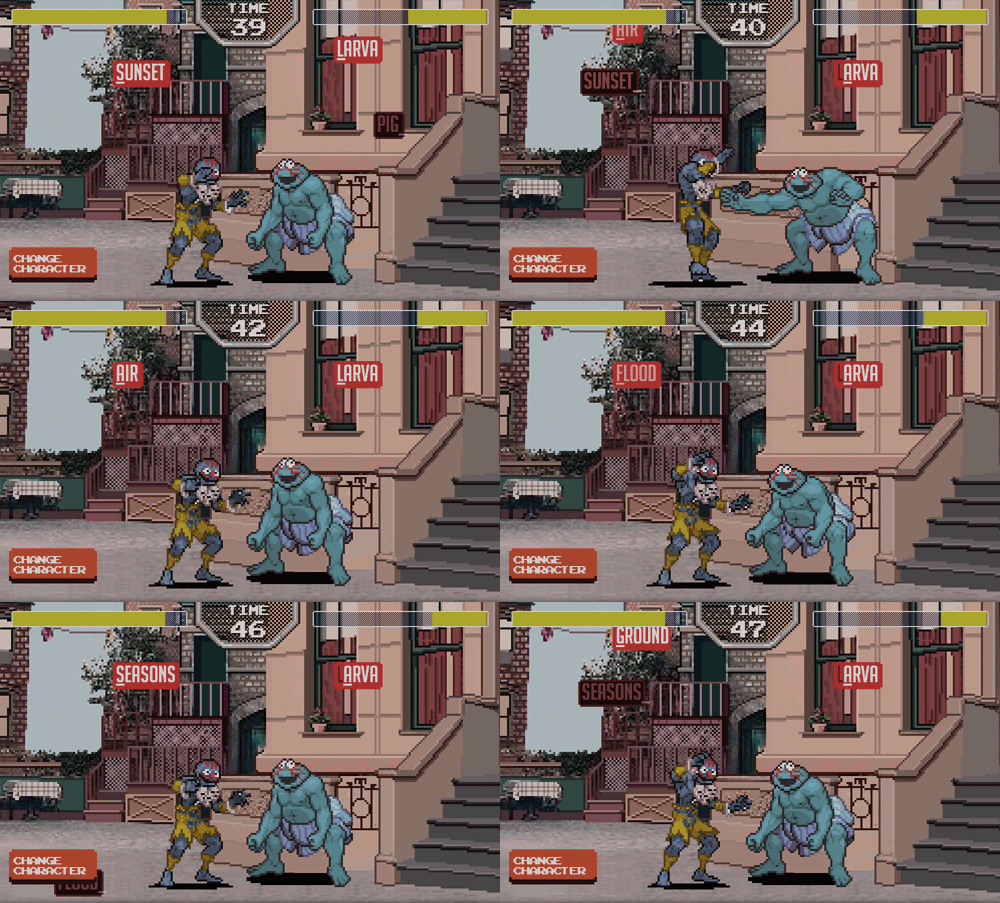
Sesame Street Fighter
Sesame Street meets Street Fighter in this typing game put together by cocoalasca. Created in HTML5 and Processing.js, you have to type words as fast as you can to hit the opponent, but the stronger the character, the harder the vocabulary.
Try it out for yourself here
Demos using AWS with Node.JS and an AngularJS frontend
Demos using AWS with Node.JS and an AngularJS frontend
I recently decided to build some reusable code for a bunch of projects that I’ve got queued up. I wanted some backend components that leveraged a few of the highly scalable Amazon AWS services. This ended up taking me a month to finish, which is way longer than the week that I had intended to spend on it. (It was a month of nights and weekends, not as much free time as I’d hoped for in January.) Oh, and before I forget, here’s the GitHub repo.
This project’s goal is to build small demo utilities that should be a reasonable approximation of what we might see in an application that uses the aws-sdk node.js module. AngularJS will serve as a front-end, with no direct access to the AWS libraries, and will use the node server to handle all requests.
Here’s a temporary EBS instance running to demonstrate this. It will be taken down in a few weeks, so don’t get so attached to it. I might migrate it to my other server, so hopefully while the URL might change, the service will remain alive.
ToC
Data Set
Both DynamoDB and RDS are going to use the same basic data set. It will be a very simple set, with two tables that are JOINable. Here’s the schema:
Users: {
    id: 0,
    name: "Steve",
    email: "steve@example.com"
}

Media: {
    id: 0,
    uid: 0,
    url: "http://example.com/image.jpg",
    type: "image/jpg"
}
The same schema will be used for both Dynamo and RDS, almost. RDS uses an mkey field in the media table, to keep track of the key. Dynamo uses a string id, which should be the key of the media object in S3.
DynamoDB
Using the above schema, we set up a couple Dynamo tables. These can be treated in a similar way to how you would treat any NoSQL database, except that Dynamo’s API is a bit onerous. I’m not sure why they insisted on not using standard JSON, but a converter can be easily written to go back and forth between Dynamo’s JSON format, and the normal JSON that you’ll want to work with. Take a look at how the converter works. Also, check out some other dynamo code here.
There are just a couple of things going on in the DynamoDB demo. We have a method for getting all the users, adding or updating a user (if the user has the same id), and deleting a user. The getAll method does a scan on the Dynamo table, but only returns 100 results. It’s a good idea to limit your results, and then load more as the user requests.
The addUpdateUser method takes in a user object, generates an id based off of the hash of the email, then does a putItem to Dynamo, which will either create a new entry, or update a current one. Finally, deleteUser runs the Dynamo API method deleteItem.
The following are a few methods that you’ll find in the node.js code. Essentially, the basics are there, and we spit the results out over a socket.io socket. The socket will be used throughout most of the examples.
Initialize
AWS.config.region = "us-east-1";
AWS.config.apiVersions = {
    dynamodb: '2012-08-10',
};
var dynamodb = new AWS.DynamoDB();
Get all the users
var getAll = function (socket) {
    dynamodb.scan({
        "TableName": c.DYN_USERS_TABLE,
        "Limit": 100
    }, function (err, data) {
    if (err) {
        socket.emit(c.DYN_GET_USERS, "error");
    } else {
        var finalData = converter.ArrayConverter(data.Items);
        socket.emit(c.DYN_GET_USERS, finalData);
    }
    });
};
Insert or update a user
var addUpdateUser = function (user, socket) {
    user.id = genIdFromEmail(user.email);
    var userObj = converter.ConvertFromJson(user);
    dynamodb.putItem({
        "TableName": c.DYN_USERS_TABLE,
        "Item": userObj
    }, function (err, data) {
        if (err) {
            socket.emit(c.DYN_UPDATE_USER, "error");
        } else {
           socket.emit(c.DYN_UPDATE_USER, data);
        }
    });
};
Delete a user
var deleteUser = function (userId, socket) {
    var userObj = converter.ConvertFromJson({id: userId});
    dynamodb.deleteItem({
        "TableName": c.DYN_USERS_TABLE,
        "Key": userObj
    }, function (err, data) {
        if (err) {
            socket.emit(c.DYN_DELETE_USER, "error");
        } else {
            socket.emit(c.DYN_DELETE_USER, data);
        }
    });
};
RDS
This one’s pretty simple, RDS gives you an olde fashioned SQL database server. It’s so common that I had to add the ‘e’ to the end of old, to make sure you understand just how common this is. Pick your favorite database server, fire it up, then use whichever node module works best for you. There’s a bit of setup and configuration, which I’ll dive into in the blog post. Here’s the code.
I’m not sure that there’s even much to talk about with this one. This example uses the mysql npm module, and is really, really straightforward. We need to start off by connecting to our DB, but that’s about it. The only thing you’ll need to figure out is the deployment of RDS, and making sure that you’re able to connect to it, but that’s a very standard topic, that I’m not going to cover here since there’s nothing specific to node.js or AngularJS.
The following are a few methods that you’ll find in the node.js code. Essentially, the basics are there, and we spit the results out over a socket.io socket. The socket will be used throughout most of the examples.
Initialize
AWS.config.region = "us-east-1";
AWS.config.apiVersions = {
    rds: '2013-09-09',
};
var rds_conf = {
    host: mysqlHost,
    database: "aws_node_demo",
    user: mysqlUserName,
    password: mysqlPassword
};
var mysql = require('mysql');
var connection = mysql.createConnection(rds_conf);
var rds = new AWS.RDS();
connection.connect(function(err){
    if (err)
        console.error("couldn't connect",err);
    else
        console.log("mysql connected");
});
Get all the users
var getAll = function(socket){
    var query = this.connection.query('select * from users;',
      function(err,result){
        if (err){
            socket.emit(c.RDS_GET_USERS, c.ERROR);
        } else {
            socket.emit(c.RDS_GET_USERS, result);
        }
    });
};
Insert or update a user
var addUpdateUser = function(user, socket){
    var query = this.connection.query('INSERT INTO users SET ?',
      user, function(err, result) {
        if (err) {
            socket.emit(c.RDS_UPDATE_USER, c.ERROR);
        } else {
            socket.emit(c.RDS_UPDATE_USER, result);
        }
    });
};
Delete a user
var deleteUser = function(userId, socket){
    var query = self.connection.query('DELETE FROM users WHERE id = ?',
      userId, function(err, result) {
        if (err) {
            socket.emit(c.RDS_DELETE_USER, c.ERROR);
        } else {
            socket.emit(c.RDS_DELETE_USER, result);
        }
    });
};
S3
This one was a little tricky, but basically, we’re just generating a unique random key and using that to keep track of the object. We then generate both GET and PUT URLs on the node.js server, so that the client does not have access to our AWS auth tokens. The client only gets passed the URLs it needs. Check out the code!
The s3_utils.js file is very simple. listBuckets is a method to
verify that you’re up and running, and lists out your current s3 buckets. Next up, generateUrlPair is simple, but important. Essentially, what we want is a way for the client to push things up to S3, without having our credentials. To accomplish this, we can generate signed URLs on the server, and pass those back to the client, for the client to use. This was a bit tricky to do, because there are a lot of important details, like making
certain that the client uses the same exact content type when it attempts to PUT the object. We’re also making it world readable, so instead of creating a signed GET URL, we’re just calculating the publicly accessible GET URL and returning that. The key for the object is random, so we don’t need to know anything about the object we’re uploading ahead of time.
(However, this demo assumes that only images will be uploaded, for simplicity.) Finally, deleteMedia is simple, we just use the S3 API to delete the object.
There are actually two versions of the S3 demo, the DynamoDB version, and the S3 version. For Dynamo, we use the Dynamo media.js file. Similarly, for the RDS version, we use the RDS media.js.
Looking first at the Dynamo version, getAll is not very useful, since we don’t really want to see everyone’s media, I don’t think this even gets called. The methods here are very similar to those in user.js, we leverage the scan, putItem, and deleteItem APIs.
The same is true of the RDS version with respect to our previous RDS example. We’re just making standard SQL calls, just like we did before.
You’ll need to modify the CORS settings on your S3 bucket for this to work. Try the following configuration:
    <?xml version="1.0" encoding="UTF-8"?>
    <CORSConfiguration xmlns="http://s3.amazonaws.com/doc/2006-03-01/">
        <CORSRule>
            <AllowedOrigin>*</AllowedOrigin>
            <AllowedOrigin>http://localhost:3000</AllowedOrigin>
            <AllowedMethod>GET</AllowedMethod>
            <AllowedMethod>PUT</AllowedMethod>
            <AllowedMethod>POST</AllowedMethod>
            <AllowedMethod>DELETE</AllowedMethod>
            <MaxAgeSeconds>3000</MaxAgeSeconds>
            <AllowedHeader>Content-*</AllowedHeader>
            <AllowedHeader>Authorization</AllowedHeader>
            <AllowedHeader>*</AllowedHeader>
        </CORSRule>
    </CORSConfiguration>
The following are a few methods that you’ll find in the node.js code. Essentially, the basics are there, and we spit the results out over a socket.io socket. The socket will be used throughout most of the examples.
Initialize
AWS.config.region = "us-east-1";
AWS.config.apiVersions = {
    s3: '2006-03-01',
};
var s3 = new AWS.S3();
Generate signed URL pair
The GET URL is public, since that’s how we want it. We could have easily generated a signed GET URL, and kept the objects in the bucket private.
var generateUrlPair = function (socket) {
    var urlPair = {};
    var key = genRandomKeyString();
    urlPair[c.S3_KEY] = key;
    var putParams = {Bucket: c.S3_BUCKET, Key: key, ACL: "public-read", ContentType: "application/octet-stream" };
    s3.getSignedUrl('putObject', putParams, function (err, url) {
        if (!!err) {
            socket.emit(c.S3_GET_URLPAIR, c.ERROR);
            return;
        }
        urlPair[c.S3_PUT_URL] = url;
        urlPair[c.S3_GET_URL] = "https://aws-node-demos.s3.amazonaws.com/" + qs.escape(key);
        socket.emit(c.S3_GET_URLPAIR, urlPair);
    });
};
Delete Object from bucket
var deleteMedia = function(key, socket) {
    var params = {Bucket: c.S3_BUCKET, Key: key};
    s3.deleteObject(params, function(err, data){
        if (!!err) {
            socket.emit(c.S3_DELETE, c.ERROR);
            return;
        }
        socket.emit(c.S3_DELETE, data);
    });
}
Client-side send file
var sendFile = function(file, url, getUrl) {
    var xhr = new XMLHttpRequest();
    xhr.file = file; // not necessary if you create scopes like this
    xhr.addEventListener('progress', function(e) {
        var done = e.position || e.loaded, total = e.totalSize || e.total;
        var prcnt = Math.floor(done/total*1000)/10;
        if (prcnt % 5 === 0)
            console.log('xhr progress: ' + (Math.floor(done/total*1000)/10) + '%');
    }, false);
    if ( xhr.upload ) {
        xhr.upload.onprogress = function(e) {
            var done = e.position || e.loaded, total = e.totalSize || e.total;
            var prcnt = Math.floor(done/total*1000)/10;
            if (prcnt % 5 === 0)
                console.log('xhr.upload progress: ' + done + ' / ' + total + ' = ' + (Math.floor(done/total*1000)/10) + '%');
        };
    }
    xhr.onreadystatechange = function(e) {
        if ( 4 == this.readyState ) {
            console.log(['xhr upload complete', e]);
            // emit the 'file uploaded' event
            $rootScope.$broadcast(Constants.S3_FILE_DONE, getUrl);
        }
    };
    xhr.open('PUT', url, true);
    xhr.setRequestHeader("Content-Type","application/octet-stream");
    xhr.send(file);
}
SES
SES uses another DynamoDB table to track emails that have been sent. We want to ensure that users have the ability to unsubscribe, and we don’t want people sending them multiple messages. Here’s the schema for the Dynamo table:
 Emails: {
     email: "steve@example.com",
     count: 1
 }
That’s it! We’re just going to check if the email is in that table, and what the count is before doing anything, then update the record after the email has been sent. Take a look at how it works.
Sending email with SES is fairly simple, however getting it to production requires jumping through a couple extra hoops. Basically, you’ll need to use SNS to keep track of bounces and complaints.
What we’re doing here is for a given user, grab all their media, package it up in some auto-generated HTML, then use the sendEmail API call to actually send the message. We are also keeping track of the number of times we send each user an email. Since this is just a stupid demo that I’m hoping can live on auto-pilot for a bit, I set a very low limit on the number of emails that may be sent to a particular address. Emails also
come with a helpful 'ubsubscribe’ link.
The following are a few methods that you’ll find in the node.js code. Essentially, the basics are there, and we spit the results out over a socket.io socket. The socket will be used throughout most of the examples.
Initialize
AWS.config.region = "us-east-1";
AWS.config.apiVersions = {
    sns: '2010-03-31',
    ses: '2010-12-01'
};
var ses = new AWS.SES();
Send Email
var sendEmail = function (user, userMedia, socket) {
    var params = {
        Source: "me@mydomain.com",
        Destination: {
            ToAddresses: [user.email]
        },
        Message: {
            Subject: {
                Data: user.name + "'s media"
            },
            Body: {
                Text: {
                    Data: "please enable HTML to view this message"
                },
                Html: {
                    Data: getHtmlBodyFor(user, userMedia)
                }
            }
        }
    };
    ses.sendEmail(params, function (err, data) {
        if (err) {
            socket.emit(c.SES_SEND_EMAIL, c.ERROR);
        } else {
            socket.emit(c.SES_SEND_EMAIL, c.SUCCESS);
        }
    });
};
SNS
We’re also listening for SNS messages to tell us if there’s an email that’s bounced or has a complaint. In the case that we get something, we immediately add an entry to the Emails table with a count of 1000. We will never attempt to send to that email address again.
I have my SES configured to tell SNS to send REST requests to my service, so that I can simply parse out the HTML, and grab the data that I need that way. Some of this is done in app.js, and the rest is handled in bounces.js. In bounces, we first need to verify with SNS that we’re receiving the requests and handling them properly. That’s what confirmSubscription is all about. Then, in handleBounce we deal with any complaints and bounces by unsubscribing the email.
AngularJS
The AngularJS code for this is pretty straightforward. Essentially, we just have a service for our socket.io connection, and to keep track of data coming in from Dynamo and RDS. There are controllers for each of the different views that we have, and they also coordinate with the services. We are also leveraging Angular’s built-in events system, to inform various pieces about when things get updated.
There’s nothing special about the AngularJS code here, we use socket.io to shuffle data to and from the server, then dump it to the UI with the normal bindings. I do use Angular events which I will discuss in a separate post.
Elastic Beanstalk Deployment
Here’s the AWS doc on setting up deployment with git integration straight from your project. It’s super simple. What’s not so straightforward, however, is that you need to make sure that the ports are set up correctly. If you can just run your node server on port 80, that’s the easiest thing, but I don’t think that the instance that you get from Amazon will allow you to do that. So, you’ll need to configure your LoadBalancer to forward port 80 to whatever port you’re running on, then open that port in the EC2 Security Group that the Beanstalk environment is running in.
Once again, do use the git command-line deployment tools, as it allows you to deploy in one line after a git commit, using git aws.push.
A couple of other notes about the deployment. First, you’re going to need to make sure that the node.js version is set correctly, AWS Elastic Beanstalk currently supports up to v0.10.21, but runs an earlier version by default. You will also need to add several environment variables from the console. I use the following parameters:
- AWS_ACCESS_KEY_ID
- AWS_SECRET_ACCESS_KEY
- AWS_RDS_HOST
- AWS_RDS_MYSQL_USERNAME
- AWS_RDS_MYSQL_PASSWORD
Doing this allowed me to not ever commit sensitive data. To get there, log into your AWS console, then go to Elastic Beanstalk and select your environment. Navigate to 'Configuration’, then to 'Software Configuration’. From here you can set the node.js version, and add environment variables. You’ll need to add the custom names above along with the values. If you’re deploying to your own box, you’ll need to at least export the above environment variables:
export AWS_ACCESS_KEY_ID='AKID'
export AWS_SECRET_ACCESS_KEY='SECRET'
export AWS_RDS_HOST='hostname'
export AWS_RDS_MYSQL_USERNAME='username'
export AWS_RDS_MYSQL_PASSWORD='pass'
Hacking Crappy Customer Support
Hacking Crappy Customer Support
The Situation
We had an issue at work the other week. Basically, we were running into some pretty serious problems with one of the SAAS services that we use (I will leave which one to the reader’s imagination). This is a mission critical service for a couple of our offerings, and it’s not particularly cheap, at $200/month for the pro service (which is what we have). This is a service that is structured in such a way that for anybody that uses it, it’s likely to be a mission critical service. This is all well and good, except that they don’t seem to bother answering support emails. We’ve had emails to them go totally unanswered before. However, until last week, we hadn’t run into an issue important enough that we really, really needed a response.
We found ourselves in a situation where we had taken a dependency on a third-party service, ran into an issue, and were getting no help from the provider. We had guessed at a work-around that turned out to be the right answer for an immediate fix, but we still needed a proper fix for this, else we would need to make larger changes to our apps to better work-around the problem. The vendor was not answering the urgent emails, and provided no phone number for the company at all.
The Hack
I had an idea. The provider has an Enterprise tier, we could contact the sales team, and say that we’re looking to possibly upgrade to Enterprise, but that we had some questions that needed to get answered first. We structured our questions in a way that first asked what we needed to know, and then asked if the Enterprise tier might solve the issue, or if they were working on a fix. This tactic worked. A couple of us separately sent emails to the Enterprise sales team (they, too, do not have a phone number listed) and received responses fairly quickly. We got our questions answered after a couple rounds of emails.
Concessions
It’s true, they didn’t promise any support, even at the pro level; we had mistakenly assumed that we’d at least be able to get questions answered via email. We should have probably done a bit more research before choosing a provider. The provider may not have been set up to handle that much in terms of support. However, they are not a small company, and could at least offer paid support as needed.
Conclusions
As far as whether or not we stick with them, we’ll see. I’m not too thrilled about paying a company $200/mo and getting the finger from them whenever something of theirs is broken. But, there are other constraints, and you can’t always get everything you want. Sometimes there simply isn’t the time to go back and fix everything that you’d like to.