Project Nautilus VR — what are they thinking?
Yesterday, a post showed up in my Google+ feed from a friend talking about Project Nautilus VR. Project Nautilus VR is a Cardboard clone that adds a full face-mask and snorkel to be used underwater. That’s right, underwater VR. And no, this is not a joke, as far as I can tell.
That’s right, underwater VR.

Nautilus VR in its natural habitat While Project Nautilus VR is an interesting application of VR, I really can’t believe that they’re actually launching this. I usually try not to talk publicly about products that I think are misguided, mainly because it’s so hard to figure out what’s going to do well despite my cynicism (Snapchat, I’m looking at you). However, this seems like an incredibly bad, and even dangerous idea. Namely, because people are going to be put into an extremely immersive VR environment, in a situation with real danger — that of drowning.
There are an average of 3,868 accidental drowning deaths each year — without people being tricked into believing that they’re in a different environment. If I were on that team, and this idea was being pitched, this would have been my immediate first question, “how are we going to prevent people from drowning while using this thing?” Given that there is no mention of safety on the Kickstarter page (aside from the one about being safe from sharks), I have to wonder if anyone on the team asked this question.
“no mention of safety”
One thing that you can see from using Cardboard, Oculus, or even watching videos of people using Oculus with certain demos, is that you become completely disoriented from your surroundings — and that’s when you’re on foot. Using Cardboard, I’ll typically end up across the room or facing in a weird direction without noticing. Project Nautilus is placing you in a less familiar situation, in the water, with a snorkel, and then removing one of your main senses. What happens when someone becomes disoriented in the water? What if they happen to drop the snorkel below the water line? Are people going to think fast enough to rip the VR unit off their head and go to the top?
Some VR experiences are immersive than others, all you have to do is watch some of the videos of people wearing the Oculus and completely freaking out when there’s some external stimuli applied at the right time during a demo. What happens to someone who gets startled, just as the big shark is swimming at them?
This is also being pitched as a consumer product, not one to be used for specific training. They’re positioning it as an educational product, and have lots of kids in the images on their Kickstarter page. I cannot fathom encouraging handing one of these things to a child without literally standing in the water next to them, to make sure that they don’t drown. While this may seem like common sense, I can see the safety issues falling through the cracks, and some unfortunate child potentially paying the price.
To be fair, I could see some very specialized uses for this, in certain training scenarios, or experiences that could be provided. They could give units to water parks with various experiences around swimming, flying, or weightlessness. However, they would have to be in supervised environments.
This is also aside from one practical issue of potentially getting your phone ruined due to a failed seal, or incorrect installation.
I really wonder why anyone would want to bring this to market? It seems like a massive liability to me. I wonder if their insurance company will end up killing it?
UPDATE: They ended up pulling the Kickstarter before it completed.
Baratza Coffee Grinder Repair
This weekend, I was preparing a batch of cold brew coffee in my Toddy, and I accidentally broke my grinder. The basket had filled up with grinds and backed up into the burrs. After spending hours cleaning the thing out, I was able to get it back to turning on, but was getting a very inconsistent, very coarse grind.
After doing some research, and looking on Baratza’s website, I found that one of the common problems is that one of the burr holders has these little tabs that are designed to break off in the event that things get jammed up, to protect the rest of the machine. All I needed to do was order the $4 replacement part, and pop it in. Now I have a working grinder again!

Bonus, I used this opportunity to adjust the default grind size from coarse to fine, so that I have my grinder more in the range that I want it in. Though, I might take it apart again, and set it to the middle setting, since my Rancilio Rocky is what I use for espresso.
For reference, here’s the troubleshooting page for Baratza:
And, here’s where to order replacement parts:
Environs

Help for running Android code workshops.
Environs is a VM image that can be downloaded to help run Android based workshops. It is a VirtualBox image built off of Ubuntu, and includes the latest Android SDK and Android Studio.
Background
Earlier this year, I ran my first Google Glass workshop. I learned exactly one thing, people will spend most of the time getting their environments set up, and very little time on the content that you want to get through. For my second workshop, I scaled back expectations, and content, and was at least able to get people up and running within the allotted time. This was a pain point, certainly, but I figured that at least I was helping people. Apparently, setting up a development environment was painful for them, and they needed help.

GDG Silicon Valley Android Wear Workshop
I tried again this Fall with an Android Wear workshop, this time it was at a GDG event, with Googlers running the event (there were two of us providing support during the event). While planning the event, we decided that mostly only experienced, and published Android developers would be invited, and we would allow only a handful of open tickets to go out. The results were mostly the same. This time, we did have a split, where about a third of the attendees were off and working on a project, but the rest were asking about setting up their dev environment. To be fair, working with Android Wear generally means using Android Studio, as opposed to Eclipse, which a good number of the attendees were more familiar with.

GDG Southern Idaho’s DevFest
The next workshop I ran was for GDG Southern Idaho’s DevFest. When I spoke with their organizer on the phone, he offered to get everyone set up the day before, so that during the event we could actually cover some of the topics. It worked like a charm, and was a great experience for everyone.
This got me thinking about the problem of development environments in the context of code workshops. An initial solution, was to split the room into different tracts. One group, the prepared ones, would get a presentation on new content, and the other would get a standard presentation on how to set up Android Studio. I did notice that for getting Android Studio set up, the same issues pop up over and over again, so doing it with a group in lock-step might actually make sense. I tried this out at a conference, and was able to get through the setup in a reasonable amount of time. However, I didn’t really like it as a solution.

GDEs at this year’s GDE summit
I was having a discussion on this topic with some other GDEs (Google Developer Experts), and somebody mentioned building a VM, and side-stepping the problem altogether. The VM should be able to be passed out on a flash drive, and that way, you just fire it up, and are all set.
I took the VM suggestion and ran with it. I built a VirtualBox VM based off of the latest Ubuntu desktop image, stripped it down a bit, installed the Android SDK, and Android Studio. I also grabbed some samples for Google Glass and Android TV, since those are not included in the official SDK samples. It is my hope that most people will be able to use this as a base for their workshops without too much trouble.
While I did go through a round of feedback from GDEs, this is largely untested. If you have trouble, please create an issue on the GitHub page, and I’ll look into it.
Instructions
- Download the image from here: http://goo.gl/W6OQA7
- Verify the MD5 sum: 935f80992c6d4ec638382f9626a2fe7a
- Import the .ova file into VirtualBox 4.3
- Fire it up
- Credentials are dev/dev (user/pass)
During the event, pass out a flash drive with the VirtualBox installers for every system, as well as Environs.ova. Have participants install VirtualBox and then import the Environs file. (They’ll need about 16GB free disk space.)
Check out the Environs website for more information.
Some Thoughts on Smart Wearables
Some Thoughts on Smart Wearables
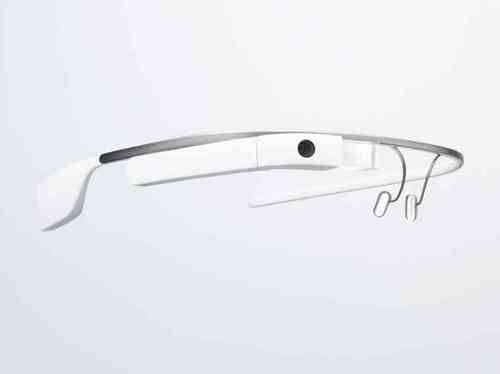
People said similar things about mobile internet devices (Smartphones, old Windows Phones, PDAs, Nokia Internet Tablets) to what some are now saying about Glass. Back before the iPhone, and really for several years after Android’s introduction, people kept asking why they needed to be able to check their email when they were away from their desk, as if that’s all a smartphone was good for. There was a niche market for this that BlackBerry did a great job of serving. This viewpoint is incredibly myopic, and I am of the opinion that it is a similarly myopic view of smart wearable devices. For smartphones, there was a game changer (actually probably a few, but I’ll focus on one) that came into play that took the smartphone from a ‘nice to have’ to a necessity, and that was real time navigation.
Real time navigation was a very clear example of a use case that strongly favored the smartphone over existing technology, and it was something that more and more people were becoming interested in. More and more people were starting to buy dedicated GPS devices at price-points between $200-$500. This device did one, and only one thing, and it did it in a relatively fixed and frustrating way. Android came out with Google Maps, as well as several other low-cost real time navigation apps with different feature sets, at a price-point of under $200, and it did a lot of other really great stuff. What’s more, the navigation experience was sure to improve over time, whereas the dedicated unit would require expensive map updates, and eventual replacement. There were also features that were very difficult for the dedicated units to do, like real-time traffic updates.
Other killer smartphone features are over-the-top calling and messaging, which can provide a much better experience than those provided by the phone companies. At this point, it’s a low-cost full-fledged computing platform. You can even write Android apps from your Android phone (not that I have any idea why someone would want to do that). Email on the go is nice, as is checking the web. And, there are tons of other really incredible mobile experiences that don’t make sense on PCs or other platforms.
Now, back to wearables. Is it possible that it’s just a bit too early to be discounting several totally novel ways of interacting with smart devices? Is it possible that there may be some applications that once released would be market drivers, and really sell the notion of smart wearables to the masses? Do you think that there’s a possibility that whoever figures out what that product is will become a huge player, worth billions of dollars? Do you still want to ignore this still untapped market? I know that I don’t want to miss what’s next. And, to be sure, I think that’s going to come from some currently unknown (or barely known) developer, who really hits it out of the park.
So yes, it may be early in the game, even too early for some, but if you want to get a head start, now’s the time to start running.
Going from Google Glass Mirror API Quick Start to Product
Going from Google Glass Mirror API Quick Start to Product
At this point, you should have either the Java or the Python Mirror API Quick Start up and running. If you do not, please check out this post, and this post (apologies that I don’t have one for Python, just Java). This post is going to discuss how to use the quick start projects to begin making progress on your product.
I’m going to talk about this in the context of a service that I’m working on building up, Hearty.io. I think that it’s important to understand the product, and the goals of the product when approaching development. I also think that it is especially important with wearables to understand your product, and how that’s going to work with wearables.
Hearty.io
![]()
Let’s get started by taking a look at what we have for a service, understanding it, and thinking about how we can use the Mirror API to extend it and offer something useful to our users. One note, Hearty.io is currently very rough and is missing quite a bit. What we will do here, is to define a current, fictional set of functionality, things that we can assume are already working. Again, to be clear, the following is a fictionalized description fo the service, that we will use for our purposes.
Hearty.io is a fitness service with several components. There is an Android component, an Android Wear component, and Glassware. There is also a backend service that keeps all of the data synchronized.
Android
The Android app does automatic activity recognition, and tracking. It uses Google Play Services to determine what the user’s current activity is, and then automatically tracks times when the user is active. The Android app posts a notification during times that it is tracking with the current activity, and the length of time tracked.
The Android app also syncs with the server, and displays data from all three sources.
Android Wear
The Wear app does step counting, and syncs directly to Android using the Android Wear Data APIs. The Android notifications for Activity tracking show up on the watch, and there is a Wearable action that would allow the user to ‘ignore’ the current activity.
Glass
The Hearty.io Glassware uses the GDK and talks to a Bluetooth Heart Rate Monitor. The user launches the Glassware by saying 'Ok Glass, show my heart rate’. When Hearty launches, if there is no device paired, it redirects into a pairing UI. Once paired, Hearty.io inserts a LiveCard that displays the users’s current heart rate. The Glassware syncs the user’s heart rate directly with the server.
Server
The server just keeps track of three things for each user, each day’s step count, number of active minutes, and average heart rate.
New Mirror functionality
The most obvious thing that I can think to do with Mirror here is to send the daily summary to the user on a daily basis. We also want to display that data in a dashboard for the user.
There are a few things to consider here, beyond simply what we want to build. The primary consideration should be if it’s something that makes sense, and would be a good experience on Glass. Mirror can be used to do things that don’t result in a good experience. For example, news content is tricky to consume on Glass. Reading lots of text on a screen, or spending up to a minute listening is not ideal. WinkFeed does a great job of providing a good experience for news, mainly because of its Pocket integration. Sometimes, a clever feature can help your Glassware to go from a mediocre experience to a great one. Take a look at the Glass Design Principles and think about whether what you’re doing is in line with those principles.
What we are going to build
Let’s build the following, a web service that uses a fake database, displays the dummy data to the user on a web app, and then allows the user to send that data to Glass.
Wiring this up to our real service should be something that we know how to do, so we are not going to cover that here. We are also not going to do the work of automating this to run on a daily basis, that should be fairly straightforward.
I’ll cover Java first, if you’re more interested in Python, feel free to skip down to that section.
Java
I’m going to assume that you’ve already been introduced to the quick start code, and so I’m going to skip the overview here. What we need to know is where we need to go in and what to modify.
JSP
The index.jsp file is what is used to generate the main web view. We are going to start by adding a section at the top with some dummy, hardcoded data. Place this above where the timeline cards are shown.
<div class="span4">
  <br>
  <table class="table">
      <tbody>
      <tr>
          <th>Heart Rate</th>
          <td>
            77
          </td>
          <th>Steps</th>
          <td>
              17,311
          </td>
          <th>Active Minutes</th>
          <td>
              89
          </td>
          <td>
          </td>
      </tr>
      </tbody>
  </table>

</div>
That will give us a table, without any actual data. Let’s add a button at the top that uses the same sort of paradigm that all of the other buttons do on this page.
<form action="<%= WebUtil.buildUrl(request, "/") %>" method="post">
    <input type="hidden" name="operation" value="insertHeartyData">
    <button class="btn btn-block" type="submit">
        Insert a bundle with Hearty Data</button>
</form>
Pretty easy, right? Notice that the value of the input is insertHeartyData, that’s going to be important when we go to the servlet.
Now, let’s make a quick side-trip, and add our dummy database.
FakeDatabase:
public class FakeDatabase {
    private static final ConcurrentHashMap<String, HeartyData> heartyData = new ConcurrentHashMap<String, HeartyData>();

    private static Random rand = new Random(System.currentTimeMillis());

    public static void generateFakeUserData(String userId) {
        HeartyData data = new HeartyData();
        data.activeMinutes = rand.nextInt(110);
        data.stepCount = rand.nextInt(25000);
        data.heartRate = rand.nextInt(50) + 50;
        heartyData.put(userId, data);
    }

    public static HeartyData getUserData(String userId) {
        return heartyData.get(userId);
    }

    private FakeDatabase(){ // not allowed to instantiate }
}
Ok, now that we have our database, we have to get data in there, so what we’ll do for that is to add the following to the NewUserBootstrap:
public static void bootstrapNewUser(HttpServletRequest req, String userId) throws IOException {
    // snip ...

    FakeDatabase.generateFakeUserData(userId);

    // snip ...
}
Back to the jsp, let’s use our “real” data there:
  <div class="span4">
    <form action="<%= WebUtil.buildUrl(request, "/") %>" method="post">
        <input type="hidden" name="operation" value="insertHeartyData">
        <button class="btn btn-block" type="submit">
            Insert a bundle with Hearty Data</button>
    </form>
    <br>
    <table class="table">
        <tbody>
        <tr>
            <th>Heart Rate</th>
            <td>
              <%= FakeDatabase.getUserData(userId).heartRate %>
            </td>
            <th>Steps</th>
            <td>
                <%= FakeDatabase.getUserData(userId).stepCount %>
            </td>
            <th>Active Minutes</th>
            <td>
                <%= FakeDatabase.getUserData(userId).activeMinutes %>
            </td>
            <td>
            </td>
        </tr>
        </tbody>
    </table>
</div>
That about does it for the viewing side, let’s try to make this do something.
Servlets
The quick start uses a Servlet for handling all of the POST requests from the web page, as well as all of the subsequent Mirror requests. We can copy one of the other insert methods, and modify it a bit for our purposes.
if (req.getParameter("operation").equals("insertHeartyData")) {
    LOG.fine("Inserting Hearty Timeline Item");

    String bundleId = String.valueOf(System.currentTimeMillis());

    TimelineItem timelineItem = new TimelineItem();
    Attachment bundleCover = new Attachment();

    String imgLoc = WebUtil.buildUrl(req, "/static/images/hearty_640x360.png");

    URL url = new URL(imgLoc);
    bundleCover.setContentType("image/png");

    timelineItem.setText("Hearty.io");
    timelineItem.setBundleId(bundleId);
    timelineItem.setIsBundleCover(true);

    TimelineItem timelineItemHeart = new TimelineItem();
    timelineItemHeart.setText("Heart Rate: " + FakeDatabase.getUserData(userId).heartRate);
    timelineItemHeart.setBundleId(bundleId);

    TimelineItem timelineItemSteps = new TimelineItem();
    timelineItemSteps.setText("Steps: " + FakeDatabase.getUserData(userId).stepCount);
    timelineItemSteps.setBundleId(bundleId);


    TimelineItem timelineItemActivity = new TimelineItem();
    timelineItemActivity.setText("Active minutes: "  + FakeDatabase.getUserData(userId).activeMinutes);
    timelineItemActivity.setBundleId(bundleId);

    // Triggers an audible tone when the timeline item is received
    timelineItem.setNotification(new NotificationConfig().setLevel("DEFAULT"));

    MirrorClient.insertTimelineItem(credential, timelineItem, "image/png", url.openStream());
    MirrorClient.insertTimelineItem(credential, timelineItemHeart);
    MirrorClient.insertTimelineItem(credential, timelineItemSteps);
    MirrorClient.insertTimelineItem(credential, timelineItemActivity);

    message = "A timeline item has been inserted.";
}
That’s a big chunk of code, but there are lots of repeated bits in there. Let’s break it apart and look at it piece by piece.
There is a repeated pattern, that I’m going to show here:
TimelineItem timelineItemHeart = new TimelineItem();
timelineItemHeart.setText("Heart Rate: " + FakeDatabase.getUserData(userId).heartRate);
timelineItemHeart.setBundleId(bundleId);

MirrorClient.insertTimelineItem(credential, timelineItemHeart);
The above is the basics for inserting an item into the timeline. Notice that the bundleId is set as well, that allows this Card to be bundled with other Cards with the same bundleId.
You’ll notice that the full block of code that was posted just repeats that pattern a few times to create four cards, a cover and three children.
Wrapping up with Java
From here, what I did was to move the Hearty.io pieces out of MainServlet and into both its own Servlet, and its own jsp file. When you do this, you’ll need to modify web.xml to map the new path to the correct servlet. You can see the final version of the code here.
Python
As with Java, I’m going to assume that you’ve already been introduced to the quick start code, and so I’m going to skip the overview here. What we need to know is where we need to go in and what to modify.
As a note, this is going to be very similar to the Java portion. Partly because it does the same thing, partly because the quick start code structures are fairly similar, and mostly because I’m lazy.
HTML Template
The index.html file is what is used to generate the main web view. We are going to start by adding a section at the top with some dummy, hardcoded data. Place this above where the timeline cards are shown.
<div class="span4">
  <br>
  <table class="table">
      <tbody>
      <tr>
          <th>Heart Rate</th>
          <td>
            77
          </td>
          <th>Steps</th>
          <td>
              17,311
          </td>
          <th>Active Minutes</th>
          <td>
              89
          </td>
          <td>
          </td>
      </tr>
      </tbody>
  </table>

</div>
That will give us a table, without any actual data. Let’s add a button at the top that uses the same sort of paradigm that all of the other buttons do on this page.
<form action="/hearty" method="post">
    <input type="hidden" name="operation" value="insertHeartyData">
    <input type="hidden" name="heart_rate" value="77">
    <input type="hidden" name="step_count" value="17,311">
    <input type="hidden" name="active_minutes" value="89">
    <button class="btn btn-block" type="submit">
        Insert a bundle with Hearty Data</button>
</form>
Pretty easy, right? Notice that the value of the input is insertHeartyData, that’s going to be important when we go to the handler. Also notice that I’ve got several input values, these are for passing values from the web frontend to the backend. There’s probably a way to attach this to a session, but I don’t know Python that well, and again, lazy.
Now, let’s make a quick side-trip, and add some sort of data generator.
Hearty:
class Hearty(object):
  def __init__(self):
    self.heart_rate = random.randrange(40,135,1)
    self.step_count = random.randrange(2000,28000,1)
    self.active_minutes = random.randrange(17,132,1)
Ok, now that we have our data, we have to get data in there, so what we’ll do for that is to add the following in the get method:
@util.auth_required
def get(self):
  # snip ...
  self.hearty = Hearty()
  self._render_template(message)
And our render template method:
def _render_template(self, message=None):
  """Render the main page template."""
  template_values = {'userId': self.userid,
                     'hearty': self.hearty }
  # snip ...
This means that every time we refresh the page, we will see new values.
Back to the template, let’s use our “real” data there:
<div class="span4">
    <form action="/hearty" method="post">
        <input type="hidden" name="operation" value="insertHeartyData">
        <input type="hidden" name="heart_rate" value="{{ hearty.heart_rate }}">
        <input type="hidden" name="step_count" value="{{ hearty.step_count }}">
        <input type="hidden" name="active_minutes" value="{{ hearty.active_minutes }}">
        <button class="btn btn-block" type="submit">
            Insert a bundle with Hearty Data</button>
    </form>
    <br>
    <table class="table">
        <tbody>
        <tr>
            <th>Heart Rate</th>
            <td>
                {{ hearty.heart_rate }}
            </td>
            <th>Steps</th>
            <td>
                {{ hearty.step_count }}
            </td>
            <th>Active Minutes</th>
            <td>
                {{ hearty.active_minutes }}
            </td>
            <td>
            </td>
        </tr>
        </tbody>
    </table>

</div>
That about does it for the viewing side, let’s try to make this do something.
Handlers
The quick start uses a handler for handling all of the POST requests from the web page, as well as all of the subsequent Mirror requests. We can copy one of the other insert methods, and modify it a bit for our purposes.
  def _insert_hearty_item(self):
    """Insert a Hearty.io timeline item."""
    logging.info('Inserting hearty timeline item')

    bundle_id = `random.random()`

    body = {
        'notification': {'level': 'DEFAULT'},
        'text': 'Hearty.io python',
        'isBundleCover': True,
        'bundleId': bundle_id
    }
    heart_rate = self.request.get('heart_rate')
    step_count = self.request.get('step_count')
    active_minutes = self.request.get('active_minutes')

    body_a = {
        'text': 'Heart Rate: ' + heart_rate,
        'bundleId': bundle_id
    }
    body_b = {
        'text': 'Steps: ' + step_count,
        'bundleId': bundle_id
    }
    body_c = {
        'text': 'Active Minutes: ' + active_minutes,
        'bundleId': bundle_id
    }

    media_link = util.get_full_url(self, "/static/images/hearty_640x360.png")
    resp = urlfetch.fetch(media_link, deadline=20)
    media = MediaIoBaseUpload(
        io.BytesIO(resp.content), mimetype='image/png', resumable=True)

    # self.mirror_service is initialized in util.auth_required.
    self.mirror_service.timeline().insert(body=body, media_body=media).execute()
    self.mirror_service.timeline().insert(body=body_a).execute()
    self.mirror_service.timeline().insert(body=body_b).execute()
    self.mirror_service.timeline().insert(body=body_c).execute()
    return  'A timeline item has been inserted.'
That’s a big chunk of code, but there are lots of repeated bits in there. Let’s break it apart and look at it piece by piece.
There is a repeated pattern, that I’m going to show here:
heart_rate = self.request.get('heart_rate')
body_a = {
    'text': 'Heart Rate: ' + heart_rate,
    'bundleId': bundle_id
}
self.mirror_service.timeline().insert(body=body_a).execute()
The above is the basics for inserting an item into the timeline. Notice that the bundleId is set as well, that allows this Card to be bundled with other Cards with the same bundleId.
You’ll notice that the full block of code that was posted just repeats that pattern a few times to create four cards, a cover and three children.
The only other thing going on here is adding the image to the bundle cover:
media_link = util.get_full_url(self, "/static/images/hearty_640x360.png")
resp = urlfetch.fetch(media_link, deadline=20)
media = MediaIoBaseUpload(
    io.BytesIO(resp.content), mimetype='image/png', resumable=True)

# insert the cover body with the media into the timeline
self.mirror_service.timeline().insert(body=body, media_body=media).execute()
Wrapping up with Python
From here, what I did was to move the Hearty.io pieces out of main_handler and into both its own handler, and its own template html file. When you do this, you’ll need to modify main to map the new routes to the correct handler. You can see the final version of the code here.
Moving forward
This post should have given you some idea of how to take the Mirror API Quick Start and start taking steps towards morphing it into your own project. You will obviously want to have your own service, with your own data, and a real database. The idea here was to start turning knobs and seeing what happens when we change things. Really, the same approach can be taken with most sample code, where you start with what’s given, and poke at it, while reading the documentation, to figure out how to do what you want to do.
Don't even try, unless you have some sort of natural ability
There was an article on Slate recently, called Practice Does Not Make Perfect, the following is my response to that article.

These sorts of articles really bug me. They might as well have titled it, “Don’t even try, unless you have some sort of natural ability”. That advice might play well for the handful of savants who are exceptionally good at something when they’re young, but doesn’t really mean anything for the rest of us. That some people have greater natural abilities than others seems so obvious that it is barely worth mentioning. You don’t need much experience in the world to bump into someone who is able to grasp certain things more quickly and easily than you.
However, the argument that encouraging practice harms society is asinine. This sort of thinking encourages is a sort of socioeconomic fatalism, where some people are destined to be the captains of industry, amazing scientists, or great artists. As opposed to encouraging people to devote their time and energy to reaching for their goals. Honestly, that socioeconomic fatalism is just about the most harmful paradigm that I can think of, and it has been pervasive enough, at least in my experience, to do anything and everything required to combat it.
This is not to say that hard work is all that it takes. But surely it’s not going to be as harmful as the author claims. Two quick examples. First, let’s say that someone wants to become a software engineer, and studies very hard, and does everything in their power that they can reasonably do to achieve that goal. However, after years of practice, they still don’t have the skills required to be a productive programmer in the field. Is this failure that harmful? Aren’t there a lot of things that you can do with that knowledge, that many cannot? Perhaps they can do QA, or documentation, or something that is perhaps not a core development job, but still takes a fair amount of technical understanding. By spending that time, the person put themselves in a much better position than they would have been not studying.
Another example is one that the author brought up, which is becoming a heart surgeon. Moving towards that goal is going to make you more and more qualified for all sorts of jobs that are not doing heart surgery, but that are living in that space, and requiring a knowledge of what is involved.
Again, this is not an excuse for societal differences, and I think that it’s also obvious that money, access, and opportunity play big roles in an individual’s success. In fact, Gladwell himself discusses some of these things in the same book that he talks about the 10,000 hours rule. One of the most important things is a person’s upbringing, and their views on authority. People from lower socioeconomic circles tend to be brought up to treat authority figures in a way that is more humble, thinking that they are not as good. Whereas those from a higher socioeconomic status tend to treat authority figures with respect, but more as equals. This small difference shapes the way that we think about the world, and how we handle the things that come our way. Shifting that world view is difficult and takes a lot of time.
Android Wear UX
Android Wear UX
Android Wear UX
I saw the news today about WhatsApp releasing a beta version of their app with Android Wear support. It got me thinking about what makes for a good experience, especially on wearables. This is something that I do think about quite a bit, but I haven’t written a lot about.
One thing that popped into my head was that my co-worker and I had solved some of the same problems on our app, Talkray, that WhatsApp is trying to address. While I don’t have much insight into WhatsApp’s design process, I can talk a bit about what we looked at when we were working on Talkray’s Android Wear support. I actually presented on this last week, here’s a video of that.
Design Principles
The Android Wear design documentation provides some guidelines on how to create a great experience on Wear:
- Focus on not stopping the user and all else will follow (5 second rule)
- Design for big gestures
- Think about stream cards first
- Do one thing, really fast
- Design for the corner of the eye
- Don’t be a constant shoulder tapper
Talkray on Android Wear
If you haven’t heard of us before, Talkray is a calling and messaging app. Talkray has had Android Wear support since Wear launched. There were two basic things that we wanted to be able to do from the watch. First, was to be able to answer incoming calls. The other thing was to be able to quickly respond to incoming messages. We came up with two basic ways of responding to messages, a canned auto reply and a voice reply.
Considerations
We took into account a few basic considerations when designing the UX for our wearable app. First and foremost, we wanted to have very, very quick interactions, as short and simple as possible. There’s a 5-second rule that shows up in Google’s documentation for Android Wear, and that is that if you force the user to interact with you on a watch for more than five seconds, they might as well have pulled out their phone.
There were several other things that we thought about too, like the fact that Wear is going to be a small screen, with limited interaction capabilities. We didn’t want to make the user read or think, as much as possible. We also wanted to make it safer to use while driving, since we know that people do text and drive, even though they shouldn’t. I realize that it’s a bit controversial to say that, but I felt that if we could cut down the interaction enough, we could give people something that would allow them to quickly and easily respond to messages without pulling their attention away from the task at hand.
Auto Reply
The first thing that we give users is a button to send a canned response to a message. This is actually a bit interesting in that it uses Activity Recognition to figure out what you’re doing and respond intelligently. E.g., if you’re driving, it will say that you’re driving and can’t talk right now.
We considered giving multiple choices for canned responses, but felt that doing so would require too much interaction, and would defeat the purpose. There’s literally only one thing to do here if you want to send a canned response. No thinking, just hit the button and you’re done.
Voice Reply
For anything beyond the canned response, we figured that people should be able to say what they want. However, after a year of using Glass, I know that when I see the speech to text running, it distracts me from just saying what I want to say, and I start thinking about what I’m reading. This is really bad for two reasons, first, it pulls my attention into the watch. Second, it distracts me from delivering the information that I want to get across.
Providing a voice-only message, that records the actual audio and sends that, means that I don’t need to think about what the machine thinks that I’m saying, the other person should be able to hear it and figure out what I’m saying based on the audio.
The one big down-side to this is that the current crop of watches don’t have speakers. This means that while we are encouraging people to send audio messages, they won’t be able to receive them. While not ideal, we felt that this was acceptable, though there may be room for improvement here.
Android Wear SDK - UX and Data Syncing
Android Wear SDK - UX and Data Syncing
Last, night, I gave a talk on the Android Wear SDK at Hacker Dojo. It was listed in a couple meetup groups, and we had about a hundred people show up for the event! The large event room in the Dojo was packed! The main focus of the talk was on UX and data syncing between the phone and the watch.
Video
Slides
Hearty.io
I also announced a little project that I’ve been working on, Hearty.io. I’ll write more about this later, but here’s how you can check it out:
git clone --recursive https://github.com/emil10001/Hearty.io.git
Thanks for all those who came out, it was a lot of fun!
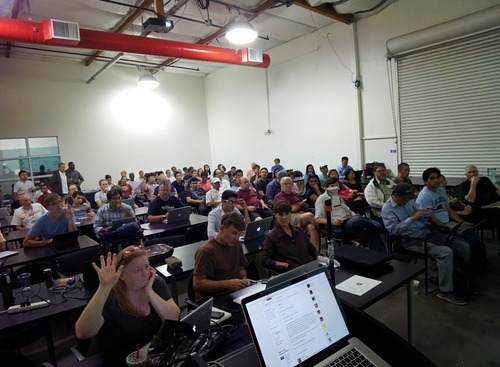
Here’s a bonus photo that I found on the meetup page. Thanks to whoever posted it!
Results - Pre-I/O Google Glass Hackathon
Results - Pre-I/O Google Glass Hackathon
The results are in. We have a series of videos of most of the presentations, captured by John Scott.
First place: Calligraphr
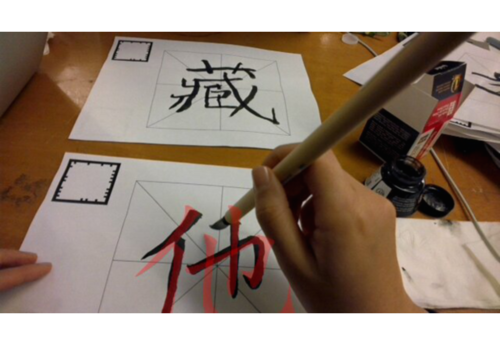
Calligraphr improves the Chinese calligraphy learning experience with augmented reality. The project interactive character animations on a piece of real paper. User can simply trace down the character with a brush pen.
Second place: Outcome Tracker

Outcome is an application for Glass that allows you to access information about a client easily and check off any objectives you want them to achieve during your meeting. The easy to use interface allows you to view client info at a glance and read more if needed. Separate tasks are represented by individual cards that can then be checked off. Safety and emergency contact info is also available for those whom have clients with allergies, disabilities, etc.
Third place: TripExplorer

TripExplore allows you to create scavenger hunts to discover knowledge in fun and interactive ways. Currently the app points you to objects of interest using augmented reality on Google Glass and upon nearing, introduces a fact about an object The app also pops a question that requires studying/examining the object at hand.
Entangled’s pick: GlassRoom

GlassRoom is a teacher’s tool to get student involved in class without picking popsicle sticks out of a cup or names out of a hat. It also tracks student performance by subject and can provide analytics with time that can help in determining weaknesses and strengths of students!
Other presentations
You can find all of the submissions for the event on ChallengePost. Here are all of the presentation videos that I have from the event:
How to run a hackathon.
How to run a hackathon.
About three months ago, I decided it would be a good idea to run a hackathon. I suppose that I thought that it would be fun, and that I’d probably learn something, since I had never run one of these before. The truth is, I had not attended that many hackathons either. No matter, I was decided.
About
This post is going to give an outline of what went into the planning, mainly different details and considerations. Check out my post on the story if you’re interested in some of the initial planning and decisions. I couldn’t have done this without the help of a bunch of people. Please see my THANK YOU! post for who contributed to the event, and what they did.
Dates and times
When I originally had this idea, I booked the large event room at Hacker Dojo. We would have been able to use the space from 7pm-10pm on Friday and 8am-10pm Saturday and Sunday, though we would have ended at 6 or 7pm on Sunday. We ended up going with 24 hours straight from Friday night at 7pm to Saturday at 7pm, and holding it in San Francisco.
The whole weekend version seemed as it would have allowed things to be a little more relaxed, and not quite as pressed for time. In practice, we would have been just as for pressed for time, though being able to get sleep in between would have been helpful. I’m not sure that one would have worked out better than the other, and in the 24 hour model, we had most teams finish and submit something.
I’m not entirely sure that the location much of a difference. While we had initially hoped to grab attention from I/O attendees, the GDG leaders summit was closer to our event, and several of our attendees were in town for that (as well as I/O). Maybe the next one will be the weekend before the GDE summit.
Venue
There are several reasons that it is important to get this figured out first. First, obviously, you need to hold the event somewhere, and you need to be able to tell people where they’re going to go for the events. Second, for us, we knew that people would be traveling to the area, and the sooner we could let them know about our event, the better. Finally, again, you can’t hold an event nowhere, well, you could, I guess, but it would be a different thing, and that’s not what we’re talking about here.
The venue was chosen by our primary sponsor. I had initially booked Hacker Dojo, but we wanted something in San Francisco, and they were excited about Galvanize. Since the sponsor was taking care of the venue, I didn’t get too involved in that decision. The venue ended up costing $3k, and while Entangled paid for that, the money could have gone to other things, like prizes.
In retrospect, the space was the easy part, and we could have likely gotten a cheaper, larger space. We actually had several offers for a venue from several different people. Here are a few other considerations when looking for a venue:
- insurance coverage
- security
- registering
- cleaning
- power outlets
- WiFi
- tables
- find out about kick-out time
- sleeping rules
- white boards or flip charts
- food storage, refrigerators
- coffee maker
Lawrence warned, “take nothing for granted, especially without a big corporation to host”. It turns out that our paying a decent amount for the space bought us most of the things that we wanted. We still needed to rent tables, and get our own insurance, but they did have security, a cleaning staff, and allowed us to hack there all night.
The people who worked at the space were also great, and I have no real complaints. They actually stayed most of the night to help with issues. One team did have issues with certain ports being filtered on the internet, but they were able to work around that.
For us, it was certainly a trade-off, where we spent more money than I would have liked, but I also had a little less that I needed to be concerned about. Then again, we needed to rent tables, and convert a working space ourselves, then convert it back at the end. In terms of planning, the fact that our sponsor was so gung-ho about it, and that they were just sort of handling it, meant one less thing for me to take care of, and that was a huge plus.
I’m going to quickly respond to each of my points with what our solutions were:
- insurance coverage
- I bought event insurance online for $125
- security
- the space had security
- registering
- we had organizers at the door checking people in
- we required people to have bought tickets on Eventbrite before coming
- cleaning
- the space mostly took care of this, but I hired a TaskRabbit for the final cleanup
- power outlets
- the space provided plenty
- WiFi
- the space had adequate WiFi
- tables
- we actually had to rent these
- find out about kick-out time
- we were good for the full 24 hours
- sleeping rules
- we told people who asked to book a room if they wanted sleep, but napping was fine
- in practice, there were a couple couches and dark, quiet corners that people slept in
- I took a few short naps overnight
- white boards or flip charts
- the space had these
- food storage, refrigerators
- there was enough space to store all the non-perishables
- we used a cooler and bought ice to chill drinks
- coffee maker
- the space had one, and one of our organizers brought one
- we also purchased coffee from Starbucks on Saturday morning
- there were tons of energy drinks
Schedule
You’ll need to have a schedule, and I wanted to give something tentative when I posted the event. There were some minor tweaks over the course of planning, like giving more time for presentations, but it’s fairly close to the original. If you don’t have a schedule, you’ll have no idea how you’re doing, and whether or not you’ll actually be able to finish the event on time. If you’re doing 24 hours straight like we were, finishing on time is fairly important, because everybody will be very tired at the end of it.
6/20
- 7:00pm
- Meet & Greet
- Start forming teams
- 7:30pm
- Announcements
- Brief talks
- 8:30pm
- Finalize Teams
- 9:00pm
- Start Hacking!
6/21
- 3:30pm
- Demo work to judges
- 5:30pm
- Judges deliberate
- 6:00pm
- Winner announced!
- Get packed up
- 7:00pm
- Event is over
We somehow managed to stick to this schedule. The only real issue was that we didn’t give enough time for team formation. There were several teams with three or four participants, and several people who wanted to join teams. We should have carved out time for the entire group to do pitches, and had a more organized team formation effort.
As for how we stayed on schedule, Allen helped quite a bit with that. It was mostly just a matter of announcing a warning, then announcing what was going on, and making sure that everyone followed up on that. When we needed to convert the theater from presentation to work mode, then back, we just asked people for help, and then the organizers started working. Once they saw us working, they all pitched in, and it took us about 10-15 minutes to flip the room inside out.
One oversight was that we should have made more time for team formation. We should have also made it a little more explicit, giving partial teams a chance to do pitches that everyone hears, and let people know how many they can take on. This would have helped a bunch of people, and we just didn’t think this through ahead of time.
Helpers
We probably had about 15 people helping out with various aspects of the event. Your needs may vary, but you will need people there. We broke up the 24 hours into shifts and had several helpers there during each shift. Don’t put yourself in the position of being the only one there, you need help!
Food
The food came nearly entirely from Costco. We used Google Shopping Express to deliver all of the food that wasn’t prepared/fresh, and then one of our organizers went on food runs to pick up the rest. Here’s a link to a detailed food budget and inventory.
One decision that we made was not to provide alcohol. This was primarily pragmatic, as we were holding a 24 hour hackathon, and alcohol tends to make people sleepy, or at least me. I also wanted to provide food for dinner on Friday that would energize people, as opposed to making them full and sleepy, but I wasn’t in charge of Friday’s dinner.
We had a cooler available, and filled it with ice, soda, and energy drinks. There was space for us to stack the boxes of stuff that we had delivered from Costco. We also had an organizer do a Costco run on Friday night, to get food for breakfast on Saturday, since Costco doesn’t open until 10am. There were some perishables that had to be taken to someone’s home overnight, since we didn’t really have access to a refrigerator. The bagels and muffins were mostly fine, though some people started getting into them overnight.
On the question of caffeine, we had two 12 cup coffee brewers. I think that we really only needed one of those. I had forgotten to bring filters, but luckily one of the brewers had a reusable nylon filter. The thing is though, when it’s hot out, and you have lots of energy drinks available, people are probbaly going to go more for the Red Bulls than coffee. What’s more, we bought several boxes of brewed Starbucks coffee for Saturday morning, and those did get used up. In the morning, people are going to want coffee, and it’s good to have a bunch ready to drink.
SWAG
It was important for us to be able to give something to every attendee, especially since we were charging a fair amount for tickets. We went back and forth on this, and came up with a couple of ideas, water bottles and t-shirts. We were initially split on the decision, so I posted a SurveyMonkey poll, and landed on t-shirts. The Glass team also provided some cool swag, small Google Glass branded notebooks and stickers.
For the t-shirts, I put in an order for nearly 150 shirts of various sizes. Some on the very small end, and some on the very large end, with the bulk of them evenly distributed between small and extra large. Here’s our order details:
- Type: Gildan Ultra Cotton T-shirt - Cherry Red, single color graphic on front
- Quantities (Y is youth):
- YM: 2
- YL: 2
- YXL: 10
- S: 30
- M: 30
- L: 30
- XL: 30
- XXL: 10
- Total quantity: 144
- Cost: $936.00
Prizes
Nearly all of the prizes came from sponsors. I was able to use about $500 from ticket sales for prize money, but everything else was from sponsors. The following is a break-down of all of the prizes.
First
- $6,500 value
- $1000 cash
- up to 5 HTC One (M7) phones (one per team member)
- Metaio SDK ($3500 value)
Second
- $3,675 value
- $1000 cash
- 2 tickets to Wearable Technologies Conference ($890 value each)
- 1 ticket to GGDevCon ($895 value)
Third
- $500 cash
Entangled’s Pick
- $500 cash
Sponsors
Entangled Ventures was the first to step up, and basically underwrite the event. They secured a great venue, as well as contributing prize money. We wouldn’t have had much of an event without Entangled. Thank you, Entangled!
The Google Glass team paid for the food for the event. Having the food covered was a huge help, as it freed up ticket sales to go to other things like swag and prizes. It also gave me some assurance that no matter what the ticket sales ended up being, we would be able to feed people. Additionally, they provided some really cool Glass swag, that everybody loved! Thank you, Google!
Metaio also pitched in for food, taking care of dinner on Friday night and enough energy drinks to plow through the entire 24 hour event. They also offered an SDK as a prize, and gave out an SDK to a participant during the event. Thank you, Metaio!
HTC offered HTC One phones to each of the members of the winning team. In addition to prizes, Dario was on-site to help out during the event. Thank you, HTC!
Wearable Technologies Conference contributed prizes, in the form of two tickets to their conference, as well as a cash prize. Thank you, Wearable Technologies Conference!
GGDevCon offered a ticket to their conference as a prize. Thank you, GGDevCon!
NotionKit gave all of our participants access to their beta tools for prototyping and previewing Glassware. Thank you, NotionKit!
Budget
This is our complete budget, broken down by sponsor, as well as totals.
Tickets
- funnel (where did buyers come from)
- graph of sales
- promotions & effectiveness
- free codes
- discount codes
- both used to help see where sales were coming from
- what should we have done?
- price-points
- what this paid for
- what we thought this would pay for
Let’s look at some Eventbrite data.
Total Ticket Sales
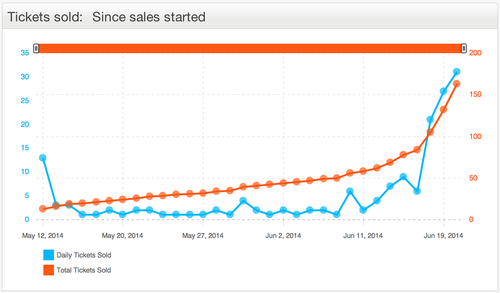
This is a graph of the total ticket sales from when we first posted to when we stopped selling tickets. The last couple of days are a little skewed because I introduced a free ‘Spectator’ type.
Ticket Sales by Type
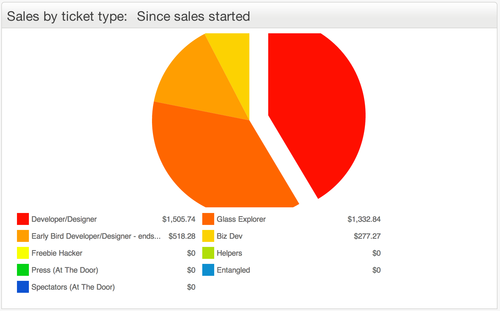
This chart shows the gross amounts that each ticket type brought in.
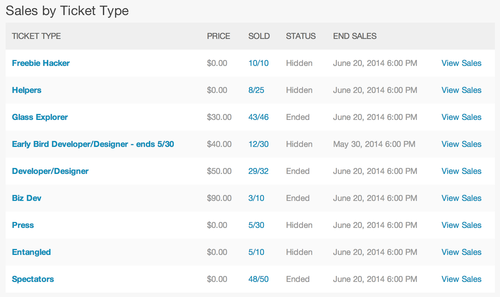
This is a more detailed look, showing how many of each type were sold, and what was not sold.
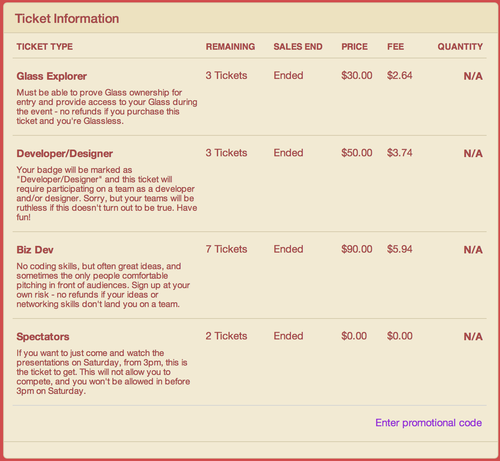
Here’s what was leftover, after sales ended.
Promotional Efforts
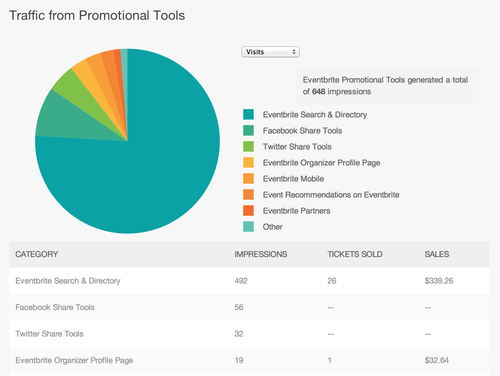
This shows a breakdown of the traffic that came through Eventbrite’s channels. You can see that it only accounts for roughly 10% of sales.
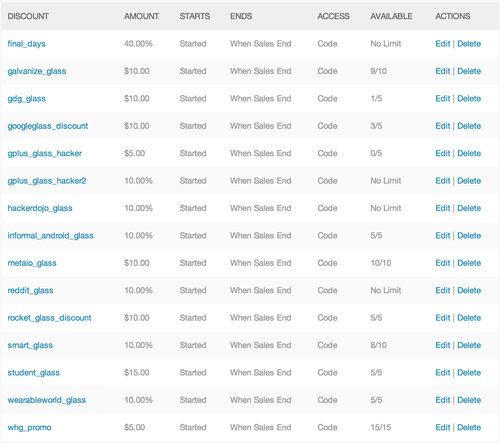
Here, we see the discount codes that I generated. These were typically generated such that each group that I shared with got their own code.
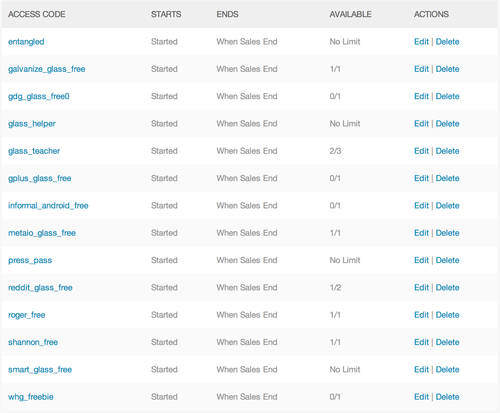
Finally, here are the access codes, that are used to unlock hidden ticket types. Some of these were for participants, some for helpers and organizers. Again, I generated individual access codes for various promotional efforts.
Logistics
The logistics of the food worked out fairly well, though timing was a little tricky, given the heavy traffic in San Francisco. Make sure that you take into account all of the time that it’s going to take to drive over there and back, and do whatever needs to be done at the place to pay. Plan on sending someone over with enough time to return when you want the food or supplies there.
As for supplies, make sure to have markers, pens, pencils, paper, whiteboards and whatever else you think will be useful to participants. You’ll probably want to have name-tags, and those are very easy to print straight from Eventbrite. We didn’t have paper or whiteboards, and that was a bit of an issue.
Check-in can be done with the Eventbrite check-in app, but you will need a few people to pull this off. People will also trickle in over a few hours, and if you want to make sure to check everyone in, you will need someone at the door that entire time. We had two people, and it mostly worked out. Also, badges help this a lot. Pro-tip: there’s an Avery badge that comes with sleeves and lanyards.
I hired a TaskRabbit person to come and help clean up after the event. This was totally worth the hundred dollars.
Hangers-on
There were a couple of people asking for free tickets, a couple people showing up at the event without tickets, a spectator telling participants he was a judge, and a potential sponsors who we didn’t hear from after not allowing them an email list. There will be people who try to take advantage.
The thing that I tried to keep in mind was that I should be fair. I should be fair to the participants, and I should be fair to the sponsors. I was not going to let people in at the last minute, because the other participants were responsible enough to handle the tickets at the appropriate time. If I had found the guy pretending to be a judge, I would have thrown him out.
As far as the sponsor wanting an email list, it would not have been fair to the other sponsors, or to the participants to give that out. I didn’t want my people spammed forever because we thought we needed a couple bucks.
Tools
Here’s a list of the main tools that we used in planning and executing the event:
- Eventbrite
- Github/Bitbucket
- Google Docs
- Google Shopping Express
- ChallengePost
I would absolutely use most of these again. Eventbrite made the a lot of things really easy for us, and I would definitely use them again. Google Shopping Express was a huge help; I use that service a lot anyways. Google Docs made the organizing and judging much more sane, no surprise there. Github/Bitbucket were used by teams who added me to do a code-review at the end of the event.
The one issue that I had was with ChallengePost. They have been very good about getting in touch and taking feedback. Hopefully the issues that I experienced will be addressed. While I may use them again, here were the issues that I had with them:
- There were 5 teams who were unable to submit anything. I’d like to be able to get them into the submissions section.
- While creating the event, I didn’t realize that I needed ChallengePost support to push the event live. I had initially thought that I was good to go after a first pass, until one of my organizers told me that it was not live.
- While setting up the event, there were a bunch of required fields that I didn’t necessarily want to fill in immediately, like the judges, because it wasn’t clear what the outcome would be, or it was earlier than I wanted to announce that information. There also appeared to be repeated information blocks, or blocks that sounded more or less the same.
- When signing up for the event, people were having issues adding people to their team. There appeared to be a UI for that that flickered out of existence in about a half second. This confused a number of people. When people sign up for an event/challenge, they should be able to form a team at that time.
- The timing was really difficult to deal with on ChallengePost. I had to specify explicit times that were only at one hour intervals, where certain features were locked out based on the time. This was incredibly frustrating, and made the tool difficult to use for me, as the organizer, and difficult for the judges.
- The judges were confused because until the judging started, there was no clear path for them to associate themselves with my event as a judge. This confused everyone including me.
- There’s probably more that I don’t quite remember now.
I’m not trying to slam ChallengePost here, again they were very pro-active in terms of contacting me, and doing their best to make sure that we had a good experience. These are simply weak spots to watch out for.
Rules
Teams
- A team is limited to 1-5 members
- All teams must have a Team Lead
- Team Lead is the sole point of contact with organizers
- Glassware presentations are led team lead
- Any prizes won will be given to the team lead, to be distributed to the team
- No remote team members
- Limited outside consulting is ok, no code commits
Tools
- Teams will use BitBucket, GitHub, or similar version control tool for code collaboration
- Teams will register themselves on ChallengePost
Only the actual work done during the hackathon should be considered.
- Teams are to add John (or another organizer) to their project on GitHub/BitBucket
- Organizer does cursory code review during presentation
- Check for commits by non-members, commits before the start of the event, after pencils down
Judging criteria
- Completeness/polish
- Glassware UX
- Difficulty
- Does it solve a problem?
- How big is the problem?
- Is it a good solution?
- Would it make a good product?
Participants will be scored by a point system
- Judges will use ChallengePost for voting
- Teams will be tracked on ChallengePost
We had some other soft rules, like the people probably shouldn’t expect to sleep overnight. Our philosophy was that if people ask, tell them no, and then let them do what they want. You can’t control everything, and people are usually pretty good about respecting the boundaries. I’m not sure how well this method would scale.
Judges
You should get more judges than you think you’ll need, because one or two of them might bail. We had two of our original line-up not able to make it. We were able to replace one, and go without the other. I feel like we had representative judges, one with more educational background, two with education technology, and one with Glass specific expertise. Given that this was a Glass hackathon for building education solutions, I think it was a good balance.
Once again, I would like to thank all of our judges, for carving out the better part of their Saturday to come and watch presentations, deal with technical issues, and work out who the favorites were. Thank you, Kim Jacobson, Josh Salcman, Allen Firstenberg, and Kevin Adler!
Pitches
We gave each team 5 minutes to present, then an additional time for Q&A. The pitches that teams made at the end would have benefited from a bit of advice. Start with telling us what you did, and showing us a demo, then explain the problem afterwords. Five minutes is not a lot of time, so you need to get to the point quickly, and get the demo out of the way - if you do a live demo at all. Live demos are good, but they can, and do, go wrong. Oh, and if you have two team members, have one start talking, and the other setting up the demo - if it isn’t set up before coming on stage. Try to do an elevator pitch, and then use the rest of the time to build your case for why this matters. We had a lot of teams get to the end of the 5 minutes, just starting to set up their demo.
If you don’t finish your project, that’s no big deal, 24 hours is not a lot of time. However, don’t make excuses, and go on and on about why you didn’t finish. Instead, talk about what you were able to get done, and where you planned on going. Finishing isn’t the only metric for judging, but if all you focus on is how you didn’t finish, then it will cast a shadow on your entire presentation.
If you’re an organizer, a good idea might be to find an alarm clock that you set up on stage so that the presenters can see how much time they have. When you’re coming up with the length of time allowed for pitches, consider that each team is going to take a couple minutes setting up and tearing down, and that each team will have some Q&A time. It may not be smart to bound the Q&A, since the judges might have lots of questions for one team, and very few for another.
Lessons Learned
Honestly, everything went really well. Next time around I would probably start pushing on ticket sales earlier in the process. I would also try to make connections with press, and really try to get them there. Another big missed opportunity was that we didn’t organize anything about posting content during and after the event. Having a hashtag for people to use when posting pictures would have been really nice. Probably the biggest thing, that we lucked out on, was recording the pitches. John Scott was recording them all, and gave me what he had, but this should have been an explicit effort that we made. I should have asked for slide decks from everyone.
Conclusion
The above was a detailed account of my experience. Here are two other sources that might provide some good additional information: