Container Tomcat Graph - Part 3
Note: I wrote this post 3 years ago, and somehow forgot to publish it. It may contain incomplete sentences, and may be complete nonsense, I am not going to re-read it. Proceed at your own risk.
So far in this series, we have created a new Tomcat app, added it to a Docker container, and run that container in Google Cloud with Kubernetes. This blog post is going to cover adding in a Titan graph as data store. And we’ll wrap up with using AngularJS as a frontend in the next post.
Here are the technologies that I’m going to use to build this app:
- Google Container Engine
- Gradle
- Docker
- Kubernetes
- Tomcat
- Titan DB (graph database)
- AngularJS 1.x (frontend)
As a prerequisite, to this, you’ll need to have Docker set up locally, and run through part 1 and part 2 of this series.
The Graph
We’re looking at building a graph today, so we should probably first talk a little about what the graph will be modeling. I figured that it would be best to keep it simple.
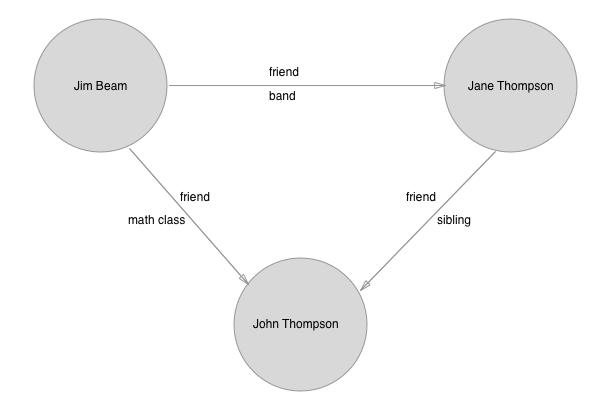
As you can see, there are a couple of parts here to pay attention to. In the above image, the circles represent nodes in the graph, also called vertices. The arrows represent edges, which are in this graph directional.
We also have properties on both the vertices (nodes) and edges. The vertices hold a first and last name, and the edges have two labels, one is ‘friend’ for all of them, and the other is a property that describes how the two people know each other.
Now, one thing to note right away is that it’s a bit strange in this case to have a directional edge.
Titan DB
For this post, we’re going to use Titan DB as our Graph Database. Titan is an open-source graph database, and implements the Apache TinkerPop 3 stack. Most of what you’re going to care about is a part of TinkerPop called Gremlin. Gremlin is the domain-specific language (DSL) that you’ll be using to traverse the graph. There’s a very helpful Getting Started guide on the TinkerPop site.
I know that this is a fairly poor explanation so far, but honestly, your best bet is to go research this a bit, because it is kind of complicated. Once you wrap your head around the model, things will start to make sense.
There’s only a little bit of Titan-specific code that we’ll be using to get the ball rolling. From there, it’ll be pretty much just Gremlin GraphTraversals.
The first thing that we’ll do is add Titan to our build.gradle file.
init Titan
Next up, we need to initialize the graph. We’re going to be running this one in-memory within our application. It may not be how you want to run in production, but it is the quickest way for us to get something up and running to poke around with.
The above is pretty much taken straight from the Titan docs, and molded from several open source examples.
Nodes and Edges
Now that we’ve got that, let’s talk a little about our data model. If you take a look at the image at the top of the post, that’s what I was thinking, people and relationships. People have names, and know other people, along with how they know each other. In this sample, we’re going to be using directional edges, and only one edge between two nodes. Titan is flexible on this, but one of my queries would go into a recursive loop if we were to have bi-directional edges.
The Person class is going to represent the nodes in our graph. We’ve got some basic properties, and want to be able to build the object from a vertex (Titan’s name for nodes).
There’s an important method call in the Person constructor, which is buildFriends(). That method does a traversal to find all of the other people that this person knows, and also captures the knowsFrom information stored on those edges. If you’re interested in breaking down this traversal, I would suggest taking a look at the Gremlin docs.
The Friend class is going to represent the edges in our graph. Here we have a basic traversal, and a method to create edges.
Servlet
All right, we’ve got our graph initialized, and have thought a little bit about data models. Now we want to query for things. What I’ve included as properties, should allow us to run some basic queries, and find relationships.
We’re building on Tomcat, so I think it makes sense to use a Servlet as our interface for making queries, and returning results.
There are two main parts to this servlet, init(), and doGet(). The init method initializes our graph with some nodes (vertices) and edges. Since we are running in-memory, none of this stuff is persisted between server runs.
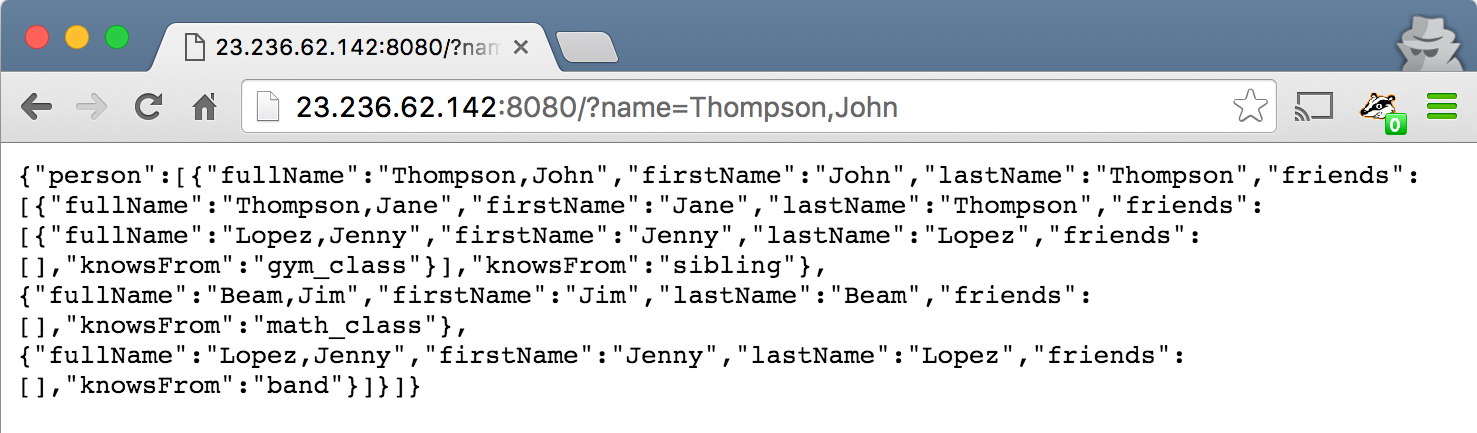
The doGet method is our typical Tomcat servlet method, and it is what we are using to accept requests and build responses. As you can see, we accept queries on relationships and names. The supported names are full names.
We can issue a request like this:
GET http://example.com:8080/?name=Thompson,John
And you should receive a response that looks like:
{"person":[{"fullName":"Thompson,John","firstName":"John","lastName":"Thompson","friends":[{"fullName":"Beam,Jim","firstName":"Jim","lastName":"Beam","friends":[],"knowsFrom":"math_class"},{"fullName":"Lopez,Jenny","firstName":"Jenny","lastName":"Lopez","friends":[],"knowsFrom":"band"},{"fullName":"Thompson,Jane","firstName":"Jane","lastName":"Thompson","friends":[{"fullName":"Lopez,Jenny","firstName":"Jenny","lastName":"Lopez","friends":[],"knowsFrom":"gym_class"}],"knowsFrom":"sibling"}]}]}
Or, formatted nicely:
As a note, you’ll also want to add gson to the build.gradle, again you can checkout the full source of the project for that.
Conclusion
We went super fast through this material, but I’m hoping that you were able to get something out of it.