Container Tomcat Graph - Part 2
Note: I wrote this post 3 years ago, and somehow forgot to publish it. It may contain incomplete sentences, and may be complete nonsense, I am not going to re-read it. Proceed at your own risk.
Last time, we covered creating a new Tomcat project, and running it locally with Docker. This blog post is going to take us through deploying our docker image to Google Cloud’s Container Engine. In future posts, I’ll cover using AngularJS as a frontend, and adding in the Titan graph.
Here are the technologies that I’m going to use to build this app:
- Google Container Engine
- Gradle
- Docker
- Kubernetes
- Tomcat
- Titan DB (graph database)
- AngularJS 1.x (frontend)
As a prerequisite, to this, you’ll need to have Docker and Google Cloud tools set up locally, and run through part 1 of this series.
Google Container Engine
Now that we’ve got something building, we want to push it off to Google and run this in the Google Cloud, to do that we will use Container Engine. Container Engine is a product that allows you to run Docker containers on Google Cloud Platform. There’s another tool that we’ll need, called Kubernetes, in order to get this done. Check out the Getting Started docs to enable the API, and install the necessary tools.
Creating a Cluster
When you click the button in the ‘Getting Started’ page, it will prompt you to define a cluster. I’d suggest specifying a size of 1, and a smaller instance type. We can always go back later and change the definition if we need to.
Once you’ve built your cluster in the Cloud Console, you’re going to want to set that as your default cluster in the command line tool (where NAME is the name of the cluster you created):
$ gcloud config set container/cluster NAME
Then authenticate yourself:
$ gcloud container clusters get-credentials NAME
Google Container Registry
Great, now we’ve got a cluster, but how do we get our Docker image to our cluster? Kubernetes pulls images from a registry, so we need to get our image into a registry. However, we don’t want to push it to the public Docker image registry, because this is our app, not a general purpose image that should be reused by other people. There’s a solution for this, called Google Container Registry, which is a private Docker registry that you can use with Kubernetes. In your Container Engine console, there’s a section for ‘Container Registry’.
Check out the Google Container Registry docs, where it talks about endpoints. There are some global region specific endpoints, and for this post, I’m going to use the us.gcr.io endpoint, since I want my image hosted in the US. Here are the list of endpoints:
- us.gcr.io - United States
- eu.gcr.io - European Union
- asia.gcr.io - Asia
- gcr.io - default, try to pick one of the others
- b.gcr.io - existing Google Storage buckets
Secure Tomcat
Before I get to uploading our container, I need to revisit something from the previous post, which was the tomcat-users.xml file.
See if you can spot the huge security flaw in that file. Hint, take a look at the user section. Obviously, setting both the username and password to ‘admin’ is very bad, and will result in your container being compromised quite quickly (as was mine). I suggest generating random values for both name and password. A better solution would be able to disable this altogether. One way that you can do for that is to rename the ‘war’ file that you upload to ROOT.war.
That said, I would not take my advice as the final word, and go research a bit on how to secure Tomcat. Either that, or don’t run the service publicly.
If your service gets compromised, you’ll get a friendly note from Google Cloud Compliance, informing you that your project will be shut off if you don’t fix it. (The tag in GitHub for the sample code for this post is not terribly secure, you may want to modify it yourself.)
Upload Container
Here’s the script that I’m using to tag and push containers:
There’s a lot going on in this script. I would suggest running it line by line manually, to make sure that everything works correctly.
The first couple of lines should be familiar, we’re basically just building the project, then building a Docker image. Next, we create a tag and endpoint with the Google Cloud tool, which will allow us to then push the built container image to Google Cloud’s private Container Registry.
It may take a couple of minutes for each of the next commands to complete. Run the Kubernetes tool to create a pod, referencing the image that we just uploaded, and giving it a name. Note, that you are limited to a 24 character, alpha-numeric name. It may allow you to create a pod and replication controller with an invalid name, but that will cause problems later. Finally, we can add the pod to a load balancer to get public traffic pointing to it.
Testing it out
Here’s what it looks like when you run ‘describe’ shortly after creating.
Note that it says “Creating load balancer”, then “Created load balancer”. This threw me initially, but it looks like it logs recent events, as opposed to giving the current status. The important bit is the LoadBalancer Ingress IP, which you can hit with your web browser, using the port you defined in Docker, and exposed in Kubernetes, and the path that you used when you ran this locally.
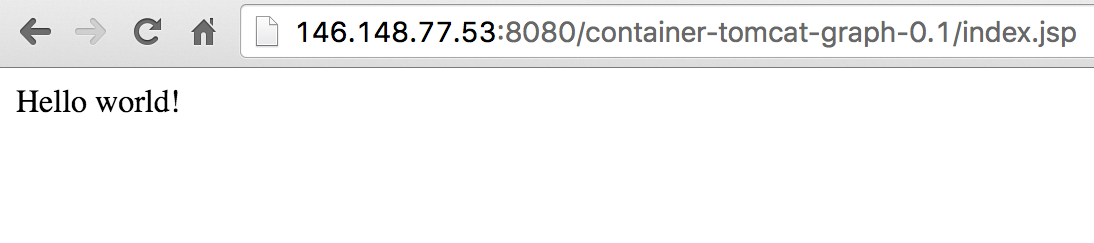
It works!
Monitoring resources
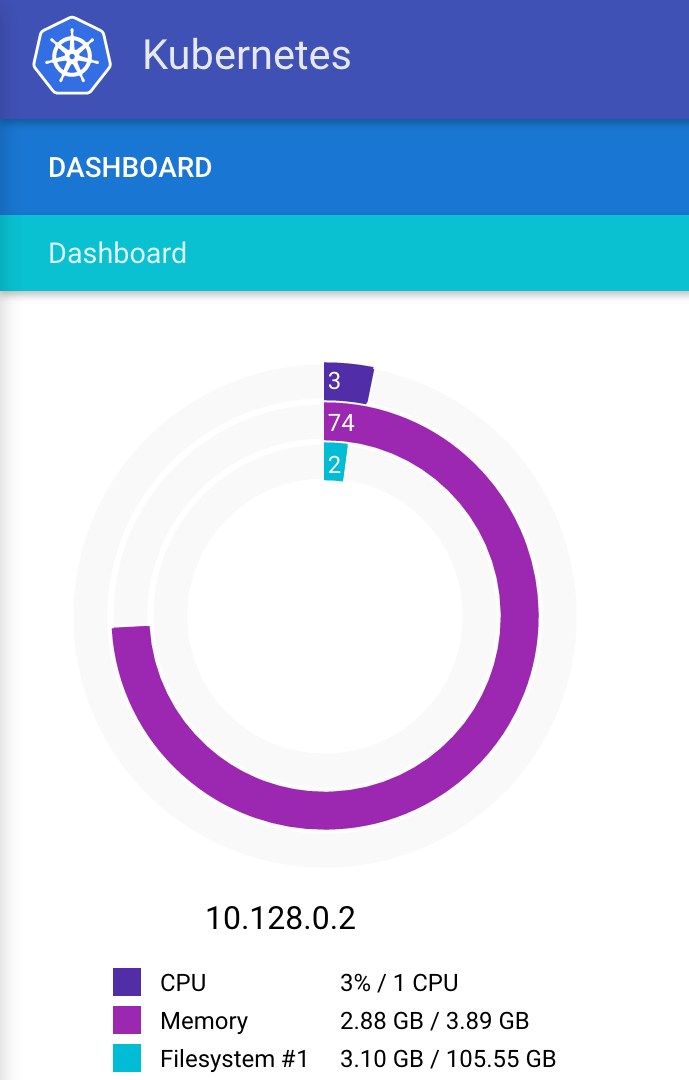
Guess what! Kubernetes for Google Cloud ships with this great set of monitoring utilities built in! This is really helpful to show you what resources are being used, and what exactly is running on the box. It’s not perfect, and there are still some holes in the knowledge, but it gives you a lot of information that isn’t in the Google Cloud Console, and you don’t need to do anything yourself to set this up.
(Hint, you may need to refresh the KubeUI page to get it to load after logging in.)
Conclusion
This was a very simple ‘Hello World’ example, but it does demonstrate how to build a Docker container image, deploy it to Google Cloud, build a Kubernetes cluster, deploy the Docker image to the cluster, and then access it. Wow, looking back, we got a lot done!
Next time, we’ll take a look at defining a simple Graph Database, and adding it to our Tomcat application. Keep an eye out for part 3 in this series!