Gradle, please
Someone posted this awesome tool on r/androiddev recently. Looks pretty sweet, I’ll certainly be using it!
Basically, it helps you find the compile string for a Gradle dependency that exists in Maven Central.
Someone posted this awesome tool on r/androiddev recently. Looks pretty sweet, I’ll certainly be using it!
Basically, it helps you find the compile string for a Gradle dependency that exists in Maven Central.
I wanted to try out the new Navigation Drawer that’s provided in a recent release of the Android Support Library. I was hoping that it would be fairly straight-forward, and it was. Here’s the official documentation, it’s what I’m basing this on, including the entirety of my MainActivity.java code, if you’re interested in just looking at that, have at it. There’s lots of code, and even a sample app to download.

I think that I’ll structure this post the same way that I did for my last one, since this is also fairly straight-forward, and builds on my last post.
Have a project set up, for use with AppCompat lib, as I showed in my previous blog post.
First up, modify your layout to be a drawer layout, and give yourself two children to work with:
If you’re using this code, you’ll need some layout to fill in the ListView that appears in the drawer:
We need a couple of strings to describe the open/close actions, so add these to your strings.xml file:
You’ll need one of these in your drawables-hdpi directory:

Really, the proper way to do this is to create a few assets at the appropriate scales, and drop them into each of the drawables directories so that they all look right. Official assets can be downloaded here.
I’ll also note that the asset may not be in my github repo yet for some reason. Android Studio didn’t pick it up as a new file, and while I’ll get it pushed up shortly, if you download this before I fix it, you may be missing that asset.
Now, we can use this in the code. This basically enables the icon in the ActionBar to be used to toggle the drawer, along with swiping from the left edge. It also adds a simple ListView within the drawer, and allows user to click those items to toast the name of the app, and change the title in the ActionBar.
I’m not going to give a detailed discussion, if you aren’t sure of what’s going on, please read the official documentation, where most of this code comes from.
Here’s the final product:

Pretty, isn’t it? Here’s the repo, on the NavDrawer branch
Continuing from my previous post, I’m toying around with a couple new projects, and I wanted to use some of the new compatibility libraries that Google’s offering for Android. Unfortunately, the setup is a bit involved, and the instructions are a bit scattered. I figured that it might be worth collecting them in a quick post. My main source of this info was the following DevBytes video:
Create a new project in Android Studio. I’ll skip the long explanation here, but if you have trouble with it, check out my previous post, it should get you going.
EDIT: Don’t forget to install the Support Libraries in the Android SDK manager.
The Gradle dependencies that we need are the same as was shown in my previous post, but here’s the build.gradle file for this project, just the same:
Add dependency in build.gradle
Adding a theme to the Activity in the manifest is really simple:
The theme needs to exist, and the parent must be one of the AppCompat provided themes.
Note: Any custom theme elements need to be defined twice, once for the compatibility version in the default namespace, one for the higher API levels in the android namespace.
Go to the Activity, and change it to extend ActionBarActivity instead of Activity.
Add a custom namespace to the menu.xml. Menu items need to be added using the support library, using the custom namespace.
And that’s it! You should be all set, be sure to give it a shot on both Froyo or Gingerbread devices as well as ICS and above. Here’s the full repo on github.
I know that I had written a month or so ago about using vim a bit more heavily instead of an IDE. That was kind of silly. While I did use vim quite a bit for doing things in JavaScript, it just can’t compete with a proper IDE. Long story short, I switched over to Intellij at work for doing some stuff with AngularJS, and finally got over the hump, and really liked it. So, I figured that it was finally time to use Intellij for Android stuff as well, especially since I want to get a couple new projects started to try out some of the new stuff that’s out there for Android. Before I forget, here’s the Google I/O talk on the new build system:
I had spent quite a bit of time writing up a how-to on using Gradle with an Anroid project in Intellij Ultimate 13 EAP, but after sinking a solid 8 hours into trying to get it to work properly, I gave up. While I was able to add a build.gradle file to the project, and run gradle build successfully, I could not get Intellij to pull dependencies from the Gradle build. I’m sure there’s a config somewhere that I am missing, but I simply ran out of time, I can’t really afford to spend more than 8 hours trying to get my environment set up to start a new project. There were several frustrating things about this. First, we were promised that with the new Android Studio, that the IDE would have deep hooks into the Gradle build system, which would solve the problems that we had seen previously in trying to use Maven for Android projects in Eclipse, for example. Second, the new Android compatibility library is much easier to deal with if you’re using Gradle, and without it, you need to jump through a bunch of extra hoops.
The trouble that I was having was that I had based my efforts on a faulty assumption - that Intellij Ultimate would be very similar in handling Android project creation to Android Studio, and should be able to handle the Gradle stuff in the same way as well. This turns out to have been an incorrect assumption. Android project creation is not the same between the two IDEs, and the key difference is that in Android Studio, when you run through the new project wizard, you end up with a Gradle backed project, that’s actually configured correctly to leverage Gradle as expected. If you create a new Android project with the wizard in Intellij, you end up with a project that is near impossible to set up Gradle IDE integration for.
I had run through a bunch of different ways of starting a new Android project, or importing one to Intellij, and was never able to get the Gradle integration working. I won’t go as far as to say that it is impossible, but again, I spent about 8 hours hammering away at it and wasn’t able to get it all the way there. I only managed to get lots of different states of semi-working, but without that all-important IDE integration, which meant that I probably could have used Gradle for building, but not for resolving dependencies.
I added a comment to this bug report for Intellij, asking for better Gradle support for Android projects.
Here are a few notes that I made about the Gradle build files and file structure that Android Studio generates.
Notice how the file layout has a parent directory, and then src/main/ before you start seeing your project’s code. Then, the packages are under the java dir. There are also two build.gradle files.
This is the build.gradle that belongs to the parent. We want to use the Gradle warpper, so we’ll initialize that here:
You can run gradle wrapper from the parent directory to generate the wrapper script and supporting files.
Here’s the settings.gradle that belongs to the parent, all it does is include your project:
The parent’s Gradle files would look a bit different if we had multiple projects being pulled in and compiled. For example, if you were including the Facebook SDK or ActionBarSherlock, you’d have to specify those projects in settings.gradle.
Now, here’s the project’s build.gradle:
Notice that I’m including the appcompat and support libraries as dependencies. I made sure that Gradle was configured to use the wrapper and that auto-import was enabled. Auto-import might be an annoyance if you touch your build files often, but for me, I wanted any changes to build.gradle to be reflected immediately in my project. E.g., if I were to add a dependent library, I’d want to be able to use it immediately without needing to manually kick off a Gradle command.
In Android Studio, this setup gets me up and running pretty quickly, and I was able to start importing things into my code immediately from those support libraries without doing much else. That’s really the beauty of this whole effort, when you’re using Android Studio, the difficult setup stuff is just kind of handled for you, and you can actually use a complex dependency management and build tool without much headache.
I’m quite disappointed by the Moto X announcement. It’s a well designed phone, battery life should be spectacular, and they got rid of some of the terrible themed junk that they put on their Droids, but it falls down on a few major points.
I really don’t want to buy another phone that ties me to a particular carrier (and phone) for another two years, when it’s likely that the phone won’t provide me with a good experience for more than one year. It seems unlikely that the Google Play Edition, when launched, will support Verizon. I don’t care as much about the Google Play Edition as I do about the fact that the carriers have to approve updates. Verizon is just plain awful at that; it’s a big reason why I’m running CyanogenMod on my Verizon Galaxy Nexus.
The customizations and optimizations look cool, but I’ll be holding out for the next Nexus phone.
This is a wacky experiment to hash out what’s necessary to create some views. I had some specific needs in a project that I’m working on. I needed a TabHost within a ViewStub, which contained ViewStubs, when inflated became ViewPagers. I also didn’t want to use fragments for this, so this is all done with normal views. It should be a fairly lightweight strategy. I populated it with a bunch of images, so those will chew up quite a bit of heap space, but the app should launch quickly, and be generally responsive.
There are no dependencies, and no permissions used for this. Feel free to pull down the code and run it yourself, this whole thing will make a lot more sense once you do. As I said, the code that I’ll be discussing was written as a sample implementation for another project that I am working on. Therefore, I didn’t spend much time optimizing it, or flattening out the hierarchy as much as I could have. There are some obvious questions that I have about things that might be removed, and I’ll try to note them as we go.
In case you are too lazy, or can’t, for some reason, install the app, here’s a few screenshots that might illuminate things for you:
 .
.

 .
.

One thing to note from the above images is that swiping between pages does not change the current tab.
Let’s start by looking at the main layout file, since that’s usually a good place to start, and will generally give you a rough idea of what you might expect to see on screen.
As you can see, there’s not much here. We’ve got a toggle button and a couple of empty views. The FrameLayout view will be used what gets set to VISIBLE/GONE by the toggle button. I probably could’ve ditched that, and used a view inside the ViewStub, but this was slightly easier to understand, slightly. Inside the FrameLayout, you’ll see a ViewStub; this allows us to inflate another layout in that spot whenever we need it. It’s cheap and light-weight, because you’re not inflating anything until it’s needed, so when the view is initially built, this will be empty until you inflate it.
If you look at the layout parameter defined in the ViewStub, it’s specifying another layout file called tabstub.xml. Let’s look at that.
This layout is a bit more interesting, as there are more things going on here. Mainly though, it’s just a standard tab layout where the tabs are not the parent view (not sure if this is strictly necessary), and where the contents of each tab are ViewStubs.
The layout for the individual tab, once inflated, is pretty simple, it’s just a ViewPager that we’ll be programmatically inflating and adding more views to.
Here we have the object that’s going to keep track of all of the layouts in all of the ViewPagers across all the tabs. It’s an enum, so that the logic will be a bit cleaner. Each of the enum’s constants represents a tab, and contains an array of layout references.
Here’s what one of the pages looks like, couldn’t be any simpler.
When we first launch this app, the view is blank, except for a toggle button. We need to click the button to get started. Here’s what gets run when you click ‘toggle’.
This does a couple of things, first it needs to initialize the tabs, in case they haven’t yet been inflated. Second, it sets the visibility of the view that contains the tabs.
When we clicked the toggle button, the first thing that happened was that we needed to initialize the tabs. This means both inflating the views, as well as setting the TabHost’s contents.
If the tabs are already initialized, we don’t need to do anything. Otherwise, we need to build them, and inflate the first ViewPager, since that’s visible. This is done with initPager().
Each tab has its own custom instance of ViewPager, and layout file. This method simply associates the two.
When we swipe between pages in the ViewPager, we need to make sure that the layouts for each page are inflated, so we override instantiateItem in our PagerAdapter.
When tabs are clicked, we need to make sure that each ViewPager is initialized, just like the first one.
While I’m still in the middle of implementing this strategy in my project, the demo worked out perfectly. I’m fairly pleased with the performance, though the images used do chew up quite a bit of memory. If you’re looking at DDMS when this is running, you might see your heap size grow to ~30MB.
A couple of days ago, I wrote up a post about Square’s OkHttp library. That was ok (pun intended), but kevinsawicki’s HttpRequest library is much simpler.
This is an excerpt from a demo app using HttpRequest, and it does the exact same thing as my OkHttp demo app:
Compare that with OkHttp’s version:
Notice the difference? HttpRequest only needs one line to do it’s thing, OkHttp needs a bit more. Now, I believe that OkHttp is intended to be a bit more general purpose, and it’s still pre-release, and without documentation. So, to be fair to OkHttp, I’m sure that there are things that it does really well, and I also think that it may be more performant than HttpRequest, at least based on the brief presentation that I heard on OkHttp.
Still, if I need to build something quickly, especially just for demonstration purposes, I really appreciate the brevity of HttpRequest.
Check out the full demo app on github. You can compare that with the demo that I did for OkHttp a few days ago. The only difference is the http library used, everything else is copied.
This is a simple example of implementing Square’s OkHttp library in an Android app. Basically, OkHttp is intending to provide a fast HTTP+SPDY java client.
Step zero is getting OkHttp either as a jar, or pulling down the project and building a jar with maven. When I built this, the jar was not available, so I needed to build it myself. This was quite simple, all you need to do is make sure you have Maven2 installed, and follow the instructions on OkHttp’s github page.
One thing to note is that you need to be building against the parent project, not just the okhttp dir. Sometimes people package up git repos such that there are actually multiple projects in a single repo, and you only need to use one of the dirs in the project. In this case, you need the parent, it will build the child projects for you.
Building:
mvn clean
mvn package -DskipTests
After you build, the jar will be in okhttp/targets.
This git repo bundles a version of okhttp that I build, but it would be better to pull down a more recent version.
I’m also using Otto here. Check out my post on Otto for a quick primer.
First up, since we’re using Otto, we register with the bus first. Then, the OkHttp logic is placed in an AsyncTask, so we’ll kick that off here too. This code lives in an Activity’s onCreate.
Here’s the logic for connecting to a site, reading the response into a string, and sending a message out onto the bus with that response string.
This is the method that’s subscribing to the bus, waiting for that response string.
There are a few nice Open Source libraries for Android that Square has published. One of them is Otto, which is a Guava-based event bus system that uses annotations and code generation. Basically, it saves you from needing to create a bunch of interfaces and register them between various parts of your code. Instead, all you need to do is register with the singleton bus, and subscribe to events.
Here’s the sample bus provider that Square published with its sample app:
Next up, register with the bus. This can be done in your Activity’s onCreate, or better register it in onResume, and unregister onPause:
Events can be published on the bus using the ‘post’ method. The object type and the subscribers determine automatically where your event gets routed. Here’s an example showing an event being fired when a button is clicked:
Subscribing to events is very simple. Again, the object being passed is what determines the event routing.
Full code on github.
Recently, on my Android tablet, I started noticing these odd notifications about Facebook having downloaded an update, where it wanted me to click the notification to install it. This is a very odd paradigm on Android, and I was immediately concerned that it might be an attempt by a drive-by download to get malware installed onto my device. Maybe this is a good point to take a step back and explain a few things.
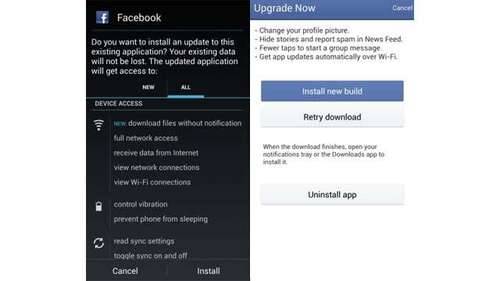
Most Android devices ship with some sort of market pre-installed. Whether it’s the Play Store, or Amazon, this is the main place that most users find, download and install their apps. Generally, developers will publish their apps through these channels. One thing that these markets provide is a basic level of security against certain types of malware, and updates to apps that you already have installed, get handled in such a way that it would be almost difficult for you to go download a malware app pretending to be an update to an app that you have installed. There is usually a ‘my apps’ section in the market where you go download your updates, or where updates are autmatically managed for you. If an app wants to notify you of an update, they should pop a notification to take you to the Play Store, or the Amazon market, or perhaps Samsung’s app market depending on your configuration.
Determining whether or not a specific market is present on a devices is actually trivially easy, and it should be just as easy to make reasonable guesses on how to fail back to less obvious markets if you find that the more popular ones are not installed.
Facebook’s new strategy seems to be that they should simply eschew the markets altogether and manage downloads themselves. I’ll take a stab at why they’re doing this, and why they might think it reasonable. Facebook, on the web, is famous for rolling out small experiments and A/B testing live on their site to see if a feature works, or how people will use it. This is really easy to do on the web. On mobile devices, you need to rely on your users updating their app regularly, and if you’re pushing out releases on a daily basis, it’s likely that your users will miss updates, and I would even venture to guess that a lot of users are just not real great about updating their apps on a regular basis. So, what’s happening on the Android app is that they have created their own pipeline for installations.
They notify you directly when there’s a new version, then when you click on the notification, you get a screen that asks you to download and install the update, or that they’ve already downloaded the app in the background, and it’s ready to install. They warn you that the version you are using has been depricated and are strongly pushing you to update. If you choose to update, you’ll be taken through the non-market package installation, which means that you have to have that setting enabled.
Something that many Android users may not be aware of is that malware is starting to become a real thing on Android. One vector of attack is something called the drive-by download. How it works is you visit a website that has been compramised, and you get an apk automatically downloaded to your device. The apk is named something like 'SecurityUpdate.apk’ or something that seems like you should install it. So, some users invariably do install it. It doesn’t seem like a huge problem right now, but it is a real thing, and companies like Lookout have been finding these attacks out in the wild. If you’re in the mood to do some research, I’d suggest Googling around for talks given by their engineers on Android security.
The basic problem with Facebook’s strategy is that it leverages the same drive-by download methods that malware does. What’s worse, is that these are real updates, users will start to get comfortable seeing updates being done like this, and as such, will be much more vulnerable to malware attacks going forward. Worse still, it would be trivially easy to copy Facebook’s design of their download/update page, and make it look like you’re going to download and install a Facebook update, when in reality, you’re actually downlaoding and installing malware.
A Facebook specific attack would be fairly easy to do. First, create a web page that looks like the Facebook for Android update screen. Also, create a malware android app whose name is facebook_update.apk and the app icon is Facebook’s app icon. Then, do a drive-by download of that web page along with the malware app ( source ), and name it something like 'Click_to_download_Facebook_update.html’. This will show up in the user’s notification drawer as the title of the downloaded file, and some number of users will open it. Now, the user is presented with a familiar looking screen, where they can just click the install button like usual, and install the app. Now, just sit back and wait for the installs.
I am going to advise everyone I know to ignore those updates, and never install through that mechanism. If Facebook keeps pushing it, I’ll advocate for uninstalling the mobile app, and using the web version instead. I’ll also be sending an email to Facebook about this, and asking others to do the same. If you know an engineer at Facebook, even better. This is just completely irresponsible behavior on Facebook’s part, and they need to correct this.
PS - I wrote this, and the sample app from the car (driving from SF Bay to Reno for some weekend skiing), so please forgive any spelling or syntax errors.